
https://eunhee-programming.tistory.com/267
(React) 리액트 달력만들기 (초간단/쉬움)
* 본 포스팅은 직접 구현한 코드입니다. * 불펌 금지합니다. * 더 좋은 코드가 있으면 가르쳐주세요 감사합니다 :) 포스팅 요약 1. 결과화면(사진 및 동영상) 2. 파일 구조 3. 코드 4. 깃허브 코드 주
eunhee-programming.tistory.com
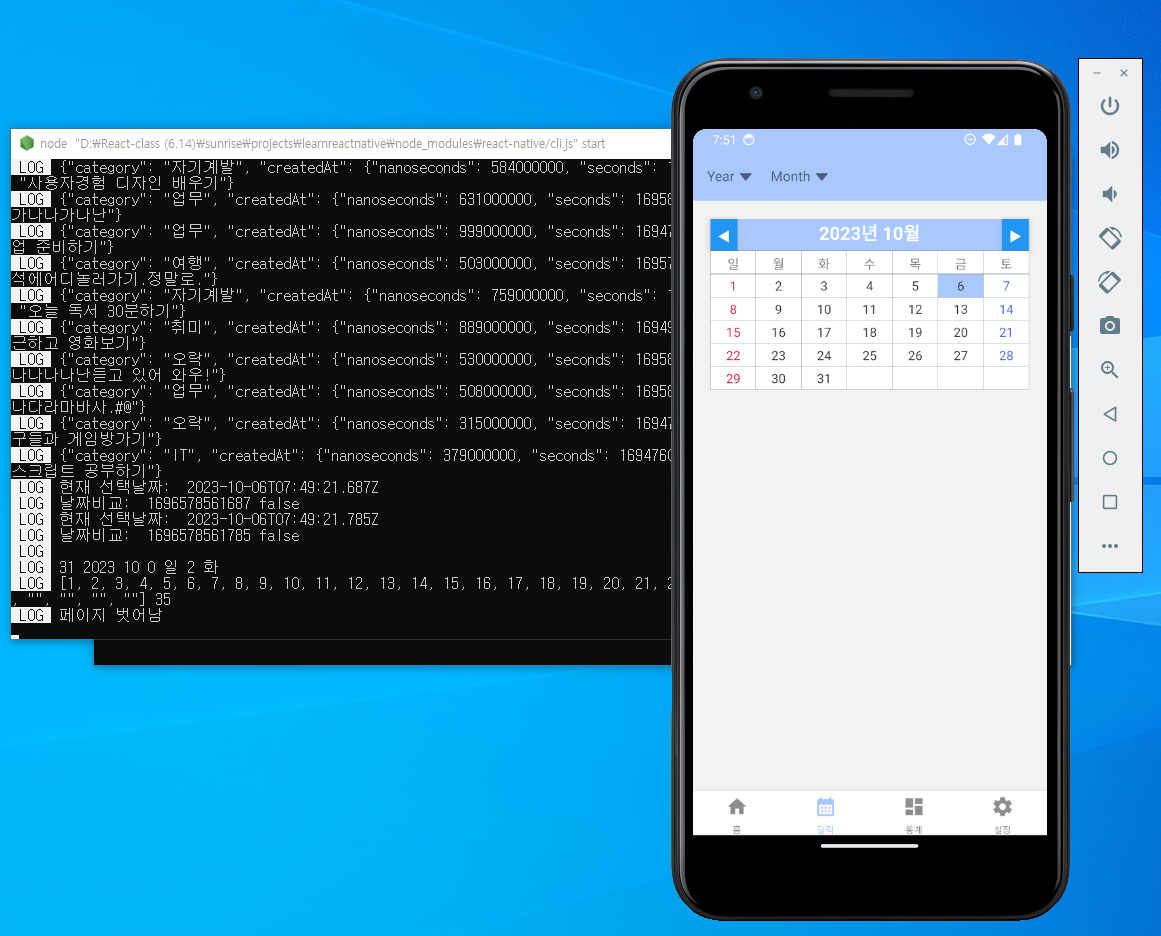
* 캘린더 화면에 년도/월 선택을 위한 드롭다운 버튼 보여주기
사용자가 특정 날짜의 할일목록을 조회하거나 수정하도록 하기 위하여 특정 날짜를 선택할 드롭다운 버튼을 보여주자!
import React, { useState, useEffect } from 'react'
import { View } from 'react-native'
import { NavigationContainer } from '@react-navigation/native';
import { createNativeStackNavigator } from '@react-navigation/native-stack';
import { createBottomTabNavigator } from '@react-navigation/bottom-tabs';
import Icon from 'react-native-vector-icons/MaterialIcons'

import HomeScreen from './screens/HomeScreen';
import CalendarScreen from './screens/CalendarScreen';
import DashBoardSceen from './screens/DashBoardScreen';
import SettingsScreen from './screens/SettingsScreen';

import DropdownCategory from './components/DropdownCategory'

import { // 할일목록 조회를 위한 유틸리티 함수 추가
  getCollection,
} from './apis/firebase'


// const Stack = createNativeStackNavigator()
const Tab = createBottomTabNavigator()

export default function App() {
  const [todos, setTodos] = useState([]) // 할일목록 상태 (HomeScreen -> App 이동)
  const [loading, setLoading] = useState(true) // 할일목록 상태 (HomeScreen -> App 이동)

  const [caretType, setCaretType] = useState(false)
  const [yearCaret, setYearCaret] = useState(false)
  const [monthCaret, setMonthCaret] = useState(false)

  useEffect(() => { // 할일목록 조회 (HomeScreen -> App 이동)
    function onResult(querySnapshot){
      const list = []
      querySnapshot.forEach(doc => {
        console.log(doc.data())
        list.push({
          ...doc.data(),
          id: doc.id,
        })
      })
      setTodos(list)
      setLoading(false)
    }
    function onError(error){
      console.error(`${error} occured when reading todos`)
    }
    return getCollection('todos',
                          onResult, onError,
                          null, null, null)
  }, [])


  return (
    <NavigationContainer>
      <Tab.Navigator initialRouteName = "Home" screenOptions={{
        tabBarActiveTintColor: '#a8c8ffff',
        // tabBarStyle: {
        //   backgroundColor: '#333'
        // }
      }}>
        <Tab.Screen name="Home" children={(props) => <HomeScreen {...props} caretType={caretType} setCaretType={setCaretType} todos={todos} loading={loading}/>} options={{
          title: '홈',
          tabBarIcon: ({ color, size }) => <Icon name="home" color={color} size={size}/>,
          headerTitle: (props) => <DropdownCategory {...props} caretType={caretType} setCaretType={setCaretType} categoryTitle="카테고리"/>,
          headerStyle: {
            backgroundColor: '#a8c8ffff',
          },
          headerTitleStyle: {
            fontWeight: 'bold',
            color: '#fff'
          },
        }}/>
        <Tab.Screen name="Calendar" children={(props) => <CalendarScreen
                                                          {...props}
                                                          yearCaret={yearCaret}
                                                          setYearCaret={setYearCaret}
                                                          monthCaret={monthCaret}
                                                          setMonthCaret={setMonthCaret}/>} options={{
          title: '달력',
          tabBarIcon: ({ color, size }) => <Icon name="calendar-month" color={color} size={size}/>,
          headerTitle: (props) => (<View style={{flexDirection: 'row'}}>
            <DropdownCategory {...props} caretType={yearCaret} setCaretType={setYearCaret} categoryTitle="Year"/>
            <DropdownCategory {...props} caretType={monthCaret} setCaretType={setMonthCaret} categoryTitle="Month"/>
          </View>),
          headerStyle: {
            backgroundColor: '#a8c8ffff',
          },
          headerTitleStyle: {
            fontWeight: 'bold',
            color: '#fff'
          },
        }}/>
        <Tab.Screen name="DashBoard" component={DashBoardSceen} options={{
          title: '통계',
          tabBarIcon: ({ color, size }) => <Icon name="dashboard" color={color} size={size}/>
        }}/>
        <Tab.Screen name="Settings" component={SettingsScreen} options={{
          title: '설정',
          tabBarIcon: ({ color, size }) => <Icon name="settings" color={color} size={size}/>
        }}/>
      </Tab.Navigator>
    </NavigationContainer>
  );
}
App 컴포넌트를 위와 같이 수정한다.
import { View } from 'react-native'View 컴포넌트를 이용하기 위하여 임포트한다.
const [yearCaret, setYearCaret] = useState(false)
const [monthCaret, setMonthCaret] = useState(false)
년도와 월을 선택할 수 있는 드롭다운 메뉴를 열고 닫기 위하여 각각 상태와 상태를 변경하는 함수를 정의한다.
<Tab.Screen name="Home" children={(props) => <HomeScreen {...props} caretType={caretType} setCaretType={setCaretType} todos={todos} loading={loading}/>} options={{
          title: '홈',
          tabBarIcon: ({ color, size }) => <Icon name="home" color={color} size={size}/>,
          headerTitle: (props) => <DropdownCategory {...props} caretType={caretType} setCaretType={setCaretType} categoryTitle="카테고리"/>,
          headerStyle: {
            backgroundColor: '#a8c8ffff',
          },
          headerTitleStyle: {
            fontWeight: 'bold',
            color: '#fff'
          },
        }}/>
DropdownCategory 컴포넌트를 재활용하기 위하여 드롭다운 버튼의 타이틀을 변경할 수 있는 categoryTitle 이라는 props 를 추가로 전달해준다.
headerTitle: (props) => <DropdownCategory {...props} caretType={caretType} setCaretType={setCaretType} categoryTitle="카테고리"/>,아래 캘린더 탭메뉴에 대한 코드가 많이 수정되었다.
<Tab.Screen name="Calendar" children={(props) => <CalendarScreen
                                                          {...props}
                                                          yearCaret={yearCaret}
                                                          setYearCaret={setYearCaret}
                                                          monthCaret={monthCaret}
                                                          setMonthCaret={setMonthCaret}/>} options={{
          title: '달력',
          tabBarIcon: ({ color, size }) => <Icon name="calendar-month" color={color} size={size}/>,
          headerTitle: (props) => (<View style={{flexDirection: 'row'}}>
            <DropdownCategory {...props} caretType={yearCaret} setCaretType={setYearCaret} categoryTitle="Year"/>
            <DropdownCategory {...props} caretType={monthCaret} setCaretType={setMonthCaret} categoryTitle="Month"/>
          </View>),
          headerStyle: {
            backgroundColor: '#a8c8ffff',
          },
          headerTitleStyle: {
            fontWeight: 'bold',
            color: '#fff'
          },
        }}/>
우선 캘린더 페이지는 component 속성이 아니라 children 속성으로 전달한다. component 속성으로는 컴포넌트에 필요한 사용자 정의 속성(props)을 전달할 수 없다. 그래서 children 속성을 사용하여 드롭다운 메뉴(년도/월)를 열고 닫는데 필요한 상태와 해당 상태를 변경하는 함수를 props 로 전달한다. CalendarScreen 컴포넌트는 yearCaret, monthCaret 상태에 따라 드롭다운 메뉴를 열거나 닫을 것이다. 또한 {...props} 로 리액트 네비게이션에서 기본적으로 제공하는 라우팅 관련 함수들을 전달받을수 있도록 한다. 대표적으로 navigation 함수가 전달된다.
children={(props) => <CalendarScreen
                          {...props}
                          yearCaret={yearCaret}
                          setYearCaret={setYearCaret}
                          monthCaret={monthCaret}
                          setMonthCaret={setMonthCaret}/>}
캘린더 페이지의 헤더(상단부분)에는 사용자가 년도/월을 선택할 수 있는 드롭다운 버튼이 위치한다. 그래서 아래와 같이 DropdwonCategory 컴포넌트를 재활용하여 드롭다운 버튼을 화면에 렌더링한다. 사용자가 드롭다운 버튼을 클릭할때마다 yearCaret, monthCaret 상태를 변경하여 드롭다운 메뉴를 보여주거나 숨겨야 하므로 해당 상태와 상태를 변경하는 함수를 props 로 전달해준다. 또한, 드롭다운 버튼명을 설정하기 위하여 categoryTitle 속성을 추가적으로 설정해준다.
headerTitle: (props) => (<View style={{flexDirection: 'row'}}>
            <DropdownCategory {...props} caretType={yearCaret} setCaretType={setYearCaret} categoryTitle="Year"/>
            <DropdownCategory {...props} caretType={monthCaret} setCaretType={setMonthCaret} categoryTitle="Month"/>
          </View>),
캘린더 페이지 헤더(상단부분)의 배경색과 폰트에 대한 설정을 하는 부분이다. 홈 페이지와 동일하다.
headerStyle: {
    backgroundColor: '#a8c8ffff',
  },
  headerTitleStyle: {
    fontWeight: 'bold',
    color: '#fff'
  },
components > DropdownCategory.js 파일을 아래와 같이 수정한다.
import React from 'react'
import { View, Text, StyleSheet, TouchableOpacity } from 'react-native'
import AntIcon from 'react-native-vector-icons/AntDesign'

const caretdownComponent = (props) => <AntIcon name="caretdown" {...props} size={15}/>
const caretupComponent = (props) => <AntIcon name="caretup" {...props} size={15}/>

function DropdownCategory({ caretType, setCaretType, categoryTitle }) {
    // console.log("캐럿다운 컴포넌트: ", caretdownComponent())
    // console.log("캐럿업 컴포넌트: ", caretupComponent())
    const onPress = () => {
        setCaretType(!caretType)
    }
    return (
        <TouchableOpacity onPress={onPress}>
            <View style={[styles.container, caretType && { alignItems: 'flex-end' }]}>
                <Text style={styles.categoryText}>{categoryTitle}</Text>
                {caretType ?
                  caretupComponent()
                : caretdownComponent()
                }
            </View>
        </TouchableOpacity>
    )
}

const styles = StyleSheet.create({
    container: {
        flexDirection: 'row',
        alignItems: 'center',
        marginRight: 20,
        // borderColor: 'red',
        // borderWidth: 1
    },
    categoryText: {
        paddingRight: 5,
        fontSize: 15
    }
})

export default DropdownCategory
드롭다운 버튼명을 다르게 설정하기 위해서 categoryTitle 속성을 추가적으로 전달받는다.
function DropdownCategory({ caretType, setCaretType, categoryTitle }) {
	// 중략
}
전달받은 categoryTitle 속성으로 드롭다운의 버튼명을 설정한다.
<Text style={styles.categoryText}>{categoryTitle}</Text>드롭다운 버튼끼리 여백을 주기 위하여 marginRight 을 설정해주었다.
container: {
        flexDirection: 'row',
        alignItems: 'center',
        marginRight: 20,
        // borderColor: 'red',
        // borderWidth: 1
    },
* 드롭다운 메뉴를 보여주는 뷰를 DropdownList 컴포넌트로 분리하기
screens > HomeScreen.js 파일을 아래와 같이 수정한다.
import React, { useState, useEffect, useRef } from 'react' // 카테고리 저장을 위한 useRef 임포트(수정)
import {
  addData,
  removeData,
  getCurrentTime,
  // getCollection // 주석처리
} from '../apis/firebase'

import { // 오늘과 내일 날짜기준을 계산하는 유틸리티 함수
  getToday,
  getTomorrow
} from '../utils/time'

import {
  SafeAreaView,
  View, Text,
  StyleSheet,
  StatusBar,
  Keyboard,
  FlatList,
  TouchableHighlight,
    Modal, Pressable
} from 'react-native'

import DateHeader from '../components/DateHeader'
import Default from '../components/Default'
import TodoInsert from '../components/TodoInsert'
import TodoList from '../components/TodoList'
import DropdownList from '../components/DropdownList'

function HomeScreen({ navigation, caretType, setCaretType, todos, loading, route }){ // 필요한 데이터 추가 (todos, loading, route)
  const categories = ['자기계발', '업무', '오락', '여행', '연애', 'IT', '취미']
  const [todoText, setTodoText] = useState('')
  const [warning, setWarning] = useState(false)
  const [modalOpen, setModalOpen] = useState(false)
  const [todoToRemove, setTodoToRemove] = useState({id: null, title: ''})

  // 오늘/내일의 날짜를 기준으로 할일목록을 필터링하고 정렬함
  const category = useRef('') // 카테고리 변수
  const date = (route.params && route.params.date) ? new Date(route.params.date) : new Date()
  const today = getToday(date) // 시간제외
  const tomorrow = getTomorrow(getToday(date))
  const todosToday = todos.filter(todo => todo.createdAt?.toDate() >= today && todo.createdAt?.toDate() < tomorrow)
  const todosTodayLatest = [...todosToday] // 원본복사
  todosTodayLatest.sort((a, b) => b.createdAt.seconds - a.createdAt.seconds) // 최신순 정렬

  console.log("현재 선택날짜: ", date)
  console.log("날짜비교: ", date.getTime(), today.getTime() != getToday(new Date()).getTime())

  const onInsertTodo = async (trimedText) => {
    if(!category.current){ // 카테고리를 선택하지 않은 경우
      setTodoText('카테고리를 먼저 선택해주세요!')
      setWarning(true)
      return
    }
    if(trimedText && trimedText.length > 3){ // 최소 글자수 제한
      if(todos.filter(todo => todo.title === trimedText).length > 0){
        setTodoText('중복된 할일입니다.')
        setWarning(true)
      }else{
        const newTodo = {
          title: trimedText,
          category: category.current || '자기계발', // 선택한 카테고리 설정 (수정)
          isDone: false,
          createdAt: getCurrentTime(), // 클라이언트 기준이 아니라 서버기준 저장시각
        }
        await addData('todos', newTodo)
        Keyboard.dismiss() // 추가버튼 클릭시 키보드 감추기
        setTodoText('') // 입력창 초기화
        category.current = '' // 카테고리 초기화 (추가)
      }
    }else{
      console.log('3자 이상 입력하세요!')
      setTodoText('3자 이상 입력하세요!')
      setWarning(true)
    }
  }

  const closeDropdown = () => {
    caretType && setCaretType(false)
  }
  const selectCategory = (item, e) => { // 카테고리 드롭다운 선택시 (추가)
    console.log("카테고리: ", item)
    closeDropdown()
    category.current = item
  }
  const handleOutSideOfMenu = (e) => {
    console.log('홈화면을 터치하셨습니다.')
    closeDropdown()
  }
  const removeTodo = (id, title) => {
    setModalOpen(true)
    setTodoToRemove({id, title})
    console.log(`할일 [${title}] 제거`)
  }
  const handleRemove = () => {
    setModalOpen(false)
    setTodoToRemove({id: null, title: ''})
    removeData('todos', todoToRemove.id)
  }

  useEffect(() => navigation.addListener('focus', () => console.log('페이지 로딩')), [])

  useEffect(() => navigation.addListener('blur', () => console.log('페이지 벗어남')), [])

  if (loading) {
    return (
      <View>
        <Text>로딩중...</Text>
      </View>
    )
  }

  return (
    <SafeAreaView
        style={styles.block}
        onTouchStart={handleOutSideOfMenu}>
      <StatusBar backgroundColor="#a8c8ffff"></StatusBar>
      <Modal
        animationType="fade"
        transparent={true}
        visible={modalOpen}
        onRequestClose={() => {
          Alert.alert('Modal has been closed.');
          setModalOpen(!modalOpen);
        }}
      >
        <View style={styles.centeredView}>
          <View style={styles.modalView}>
            <Text style={styles.guideText}>할일 "{todoToRemove.title}" 을 제거하시겠습니까?</Text>
            <View style={styles.alignHorizontal}>
              <Pressable
                style={[styles.button, styles.buttonClose, styles.remove]}
                onPress={handleRemove}>
                <Text style={styles.textStyle}>삭제</Text>
              </Pressable>
              <Pressable
                style={[styles.button, styles.buttonClose]}
                onPress={() => setModalOpen(false)}>
                <Text style={styles.textStyle}>닫기</Text>
              </Pressable>
            </View>
          </View>
        </View>
      </Modal>

        {caretType && <DropdownList categories={categories} selectCategory={selectCategory} top={-15}/>}
        <DateHeader date={date}/>
        {/* 해당날짜 기준 최신순으로 정렬된 할일목록 */}
        {todosTodayLatest.length === 0 ?
            <Default/> :
            <TodoList todos={todosTodayLatest} removeTodo={removeTodo}
        />}
        {/* 필터링된 할일목록의 날짜와 현재 날짜가 동일하지 않은 경우 */}
        <TodoInsert
          onInsertTodo={onInsertTodo}
          todoText={todoText}
          setTodoText={setTodoText}
          warning={warning}
          setWarning={setWarning}
          disabled={today.getTime()<getToday(new Date()).getTime()}/>
    </SafeAreaView>
  )
}

const styles = StyleSheet.create({
  block: {
    flex: 1,
  },
  centeredView: {
    flex: 1,
    justifyContent: 'center',
    alignItems: 'center',
    marginTop: 22,
  },
  modalView: {
    margin: 50,
    backgroundColor: 'white',
    borderRadius: 20,
    padding: 20,
    alignItems: 'center',
    shadowColor: '#000',
    shadowOffset: {
      width: 0,
      height: 2,
    },
    shadowOpacity: 0.25,
    shadowRadius: 4,
    elevation: 5,
  },
  alignHorizontal: {
    flexDirection: 'row',
    justifyContent: 'flex-end'
  },
  guideText: {
    fontWeight: 'bold',
    fontSize: 15
  },
  button: {
    width: 70,
    height: 40,
    borderRadius: 10,
    padding: 0,
    elevation: 2,
    marginTop: 30,
    marginRight: 5,
    justifyContent: 'center'
  },
  buttonOpen: {
    backgroundColor: '#F194FF',
  },
  buttonClose: {
    backgroundColor: '#a8c8ffff',
  },
  textStyle: {
    color: 'white',
    fontWeight: 'bold',
    textAlign: 'center',
  },
  remove: {
    backgroundColor: 'red'
  },
  modalText: {
    marginBottom: 15,
    textAlign: 'center',
  },
})
export default HomeScreen
드롭다운 메뉴를 보여주는 뷰는 홈화면 뿐만 아니라 캘린더 화면에서도 재활용하기 위하여 따로 컴포넌트로 분리한다. 그래서 DropdownList 로 명명하고 임포트해서 사용하도록 한다.
import DropdownList from '../components/DropdownList'기존에 드롭다운 메뉴를 보여주는 뷰이다. 해당 코드는 캘린더 화면에서도 드롭다운 메뉴를 보여주어야 하므로 재활용하기 위하여 따로 컴포넌트로 분리한다.
{caretType
        && (
            <View
              style={styles.dropdownShadow}
              onTouchStart={(e) => { // 터치 시작점 설정 : 캡쳐링 방지 (추가)
                console.log('여기를 지나침')
                e.stopPropagation() // 터치 버블링 방지
              }}
              >
              <FlatList
                data={categories}
                keyExtractor={item => item}
                renderItem={({item}) => (
                  <DropdownItem category={item} selectCategory={(e) => selectCategory(item, e)}/> // 아이템 각각의 뷰 화면 : 카테고리 선택시 이벤트핸들러 함수 등록 (수정)
                )}
                style={styles.dropdownList}
              />
          </View>
        )}
위 코드를 삭제하고 아래와 같이 간단하게 컴포넌트를 사용하도록 한다.
{caretType && <DropdownList categories={categories} selectCategory={selectCategory} top={-15}/>}categories 속성은 드롭다운 메뉴에 보여줄 아이템을 배열 형태로 전달한다. selectCategory 속성은 메뉴에서 특정 아이템을 선택할때 실행되는 함수이다. top 은 드롭다운 메뉴를 보여줄 Y축 위치를 잡아준다. 드롭다운 메뉴마다 위치가 다를 것이므로 반드시 설정해주어야 재활용할 수 있다.
<TodoInsert
          onInsertTodo={onInsertTodo}
          todoText={todoText}
          setTodoText={setTodoText}
          warning={warning}
          setWarning={setWarning}
          disabled={today.getTime()<getToday(new Date()).getTime()}/>
TodoInsert 컴포넌트의 disabled 조건을 수정해주었다. 이전에는 오늘의 할일목록만 수정할 수 있도록 하였지만, 등호를 부등호로 변경하여 오늘을 기점으로 미래의 할일목록도 수정할 수 있도록 하였다.
dropdownList: {
    padding: 5
  },
  dropdownShadow: {
    shadowOffset: { width: 0, height: 20 },
    shadowColor: '#000',
    shadowOpacity: 0.25,
    backgroundColor : "#fff", // invisible color
    zIndex: 1,
    elevation: 1,
    position: 'absolute',
    top: -15,
    borderRadius: 5,
    margin: 15
  },
기존에 드롭다운 메뉴를 스타일링하는 부분은 이제 삭제하도록 한다. 이는 DropdownList 컴포넌트로 이동할 것이다.
* 드롭다운 메뉴를 보여주는 DropdownList 컴포넌트 만들기
import React from 'react'
import { View, FlatList, StyleSheet, Dimensions } from 'react-native'

import DropdownItem from './DropdownItem'

function DropdownList({ categories, selectCategory, top, left, rate = 1 }){
    return (
        <View
              style={[styles.dropdownShadow, {top, left, maxHeight: Dimensions.get("window").height * rate}]}
              onTouchStart={(e) => { // 터치 시작점 설정 : 캡쳐링 방지 (추가)
                console.log('여기를 지나침')
                e.stopPropagation() // 터치 버블링 방지
              }}
              >
              <FlatList
                data={categories}
                keyExtractor={item => item}
                renderItem={({item}) => (
                  <DropdownItem category={item} selectCategory={(e) => selectCategory(item, e)}/> // 아이템 각각의 뷰 화면 : 카테고리 선택시 이벤트핸들러 함수 등록 (수정)
                )}
                style={styles.dropdownList}
              />
          </View>
    )
}
const styles = StyleSheet.create({
    dropdownList: {
        padding: 5,
    },
    dropdownShadow: {
        shadowOffset: { width: 0, height: 20 },
        shadowColor: '#000',
        shadowOpacity: 0.25,
        backgroundColor : "#fff", // invisible color
        zIndex: 1,
        elevation: 1,
        position: 'absolute',
        borderRadius: 5,
        margin: 15,
    },
})
export default DropdownList
components > DropdownList.js 파일을 생성하고 위와 같이 작성한다.
import { View, FlatList, StyleSheet, Dimensions } from 'react-native'드롭다운 메뉴를 보여주기 위하여 View, FlatList 컴포넌트를 임포트한다. Dimensions 는 드롭다운 메뉴의 최대높이(max height)을 설정하기 위하여 전체 모바일 화면의 높이를 조회하기 위해 임포트한다.
import DropdownItem from './DropdownItem'드롭다운 메뉴 각각의 아이템을 보여주어야 하므로 해당 컴포넌트를 임포트한다.
function DropdownList({ categories, selectCategory, top, left, rate = 1 }){
// 중략
}
드롭다운 메뉴의 위치를 설정하기 위하여 top, left 속성을 추가적으로 전달받는다. 또한, 드롭다운 메뉴의 최대높이를 전체화면 높이에서 얼마만큼의 비율로 설정할지 정해주기 위하여 rate 속성을 추가적으로 전달받는다.
<View
  style={[styles.dropdownShadow, {top, left, maxHeight: Dimensions.get("window").height * rate}]}
  // 중략
>
// 중략
</View>
드롭다운 메뉴의 위치는 props 로 전달받은 top, left 값을 이용하여 설정한다. 드롭다운 메뉴의 최대높이(maxHeight)은 모바일 전체화면 높이에서 rate 비율만큼으로 설정한다. rate 은 0 보다 크고 1보다 작은 값이다. Dimensions.get("window").height 이 모바일의 전체화면 높이이다.
dropdownShadow: {
        shadowOffset: { width: 0, height: 20 },
        shadowColor: '#000',
        shadowOpacity: 0.25,
        backgroundColor : "#fff", // invisible color
        zIndex: 1,
        elevation: 1,
        position: 'absolute',
        borderRadius: 5,
        margin: 15,
    },
해당 스타일 코드에서 top 속성을 제거하였다.
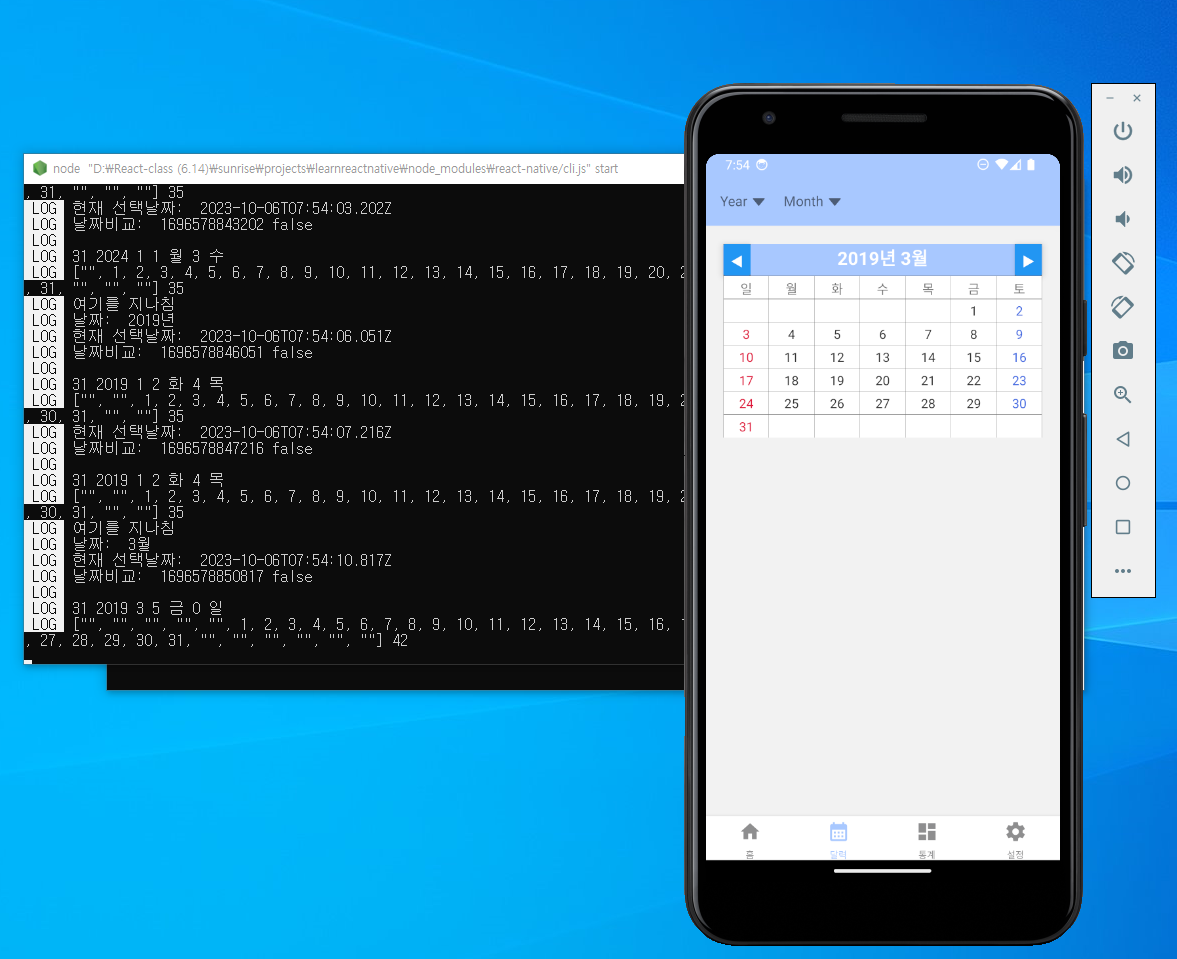
* 캘린더 화면에 달력 보여주기
본격적으로 캘린더 화면에 달력을 보여주는 코드를 작성해보자!
import React, { useState, useCallback } from 'react'
import {
SafeAreaView,
View, Text,
StyleSheet,
StatusBar,
Button,
FlatList,
Dimensions,
TouchableWithoutFeedback
} from 'react-native'
import { getFullCalendar } from '../utils/time'
import DropdownList from '../components/DropdownList'
function CalendarScreen({navigation, yearCaret, setYearCaret, monthCaret, setMonthCaret }){
const today = getFullCalendar(new Date())
const week = ["일", "월", "화", "수", "목", "금", "토"] //일주일
const [selectedYear, setSelectedYear] = useState(today.year) //현재 선택된 연도
const [selectedMonth, setSelectedMonth] = useState(today.month) //현재 선택된 달
const N = 10 // +-10년 범위
const offset = today.year - N
const yearsRange = Array(2*N).fill(0).map((_, id) => `${id+offset}년`)
const monthRange = Array(12).fill(0).map((_, id) => `${id+1}월`)
const daysOfMonth = new Date(selectedYear, selectedMonth, 0).getDate() //선택된 연도, 달의 마지막 날짜
const day = new Date(selectedYear, selectedMonth - 1, 1).getDay() // 첫째날 요일
const lastDay = new Date(selectedYear, selectedMonth - 1, daysOfMonth).getDay() // 마지막날 요일
const days = [...Array(day).fill(""), ...Array(daysOfMonth).fill(0).map((_, id) => id+1), ...Array(week.length-(lastDay+1)).fill("")]
console.log(daysOfMonth, selectedYear, selectedMonth, day, week[day], lastDay, week[lastDay])
console.log(days, days.length)
const prevMonth = useCallback(() => { //이전 달 보기 보튼
if (selectedMonth === 1) {
setSelectedMonth(12)
setSelectedYear(selectedYear - 1)
} else {
setSelectedMonth(selectedMonth - 1)
}
}, [selectedMonth])
const nextMonth = useCallback(() => { //다음 달 보기 버튼
if (selectedMonth === 12) {
setSelectedMonth(1)
setSelectedYear(selectedYear + 1)
} else {
setSelectedMonth(selectedMonth + 1)
}
}, [selectedMonth])
const selectCategory = (item, e) => { // 날짜 드롭다운 선택시 (추가)
console.log("날짜: ", item)
const lastChr = item[item.length-1]
if(lastChr === "년"){
setSelectedYear(parseInt(item))
}else if(lastChr === "월"){
setSelectedMonth(parseInt(item))
}
closeDropdown()
}
const closeDropdown = () => {
yearCaret && setYearCaret(false)
monthCaret && setMonthCaret(false)
}
const handleOutSideOfMenu = (e) => {
console.log('캘린더 화면을 터치하셨습니다.')
closeDropdown()
}
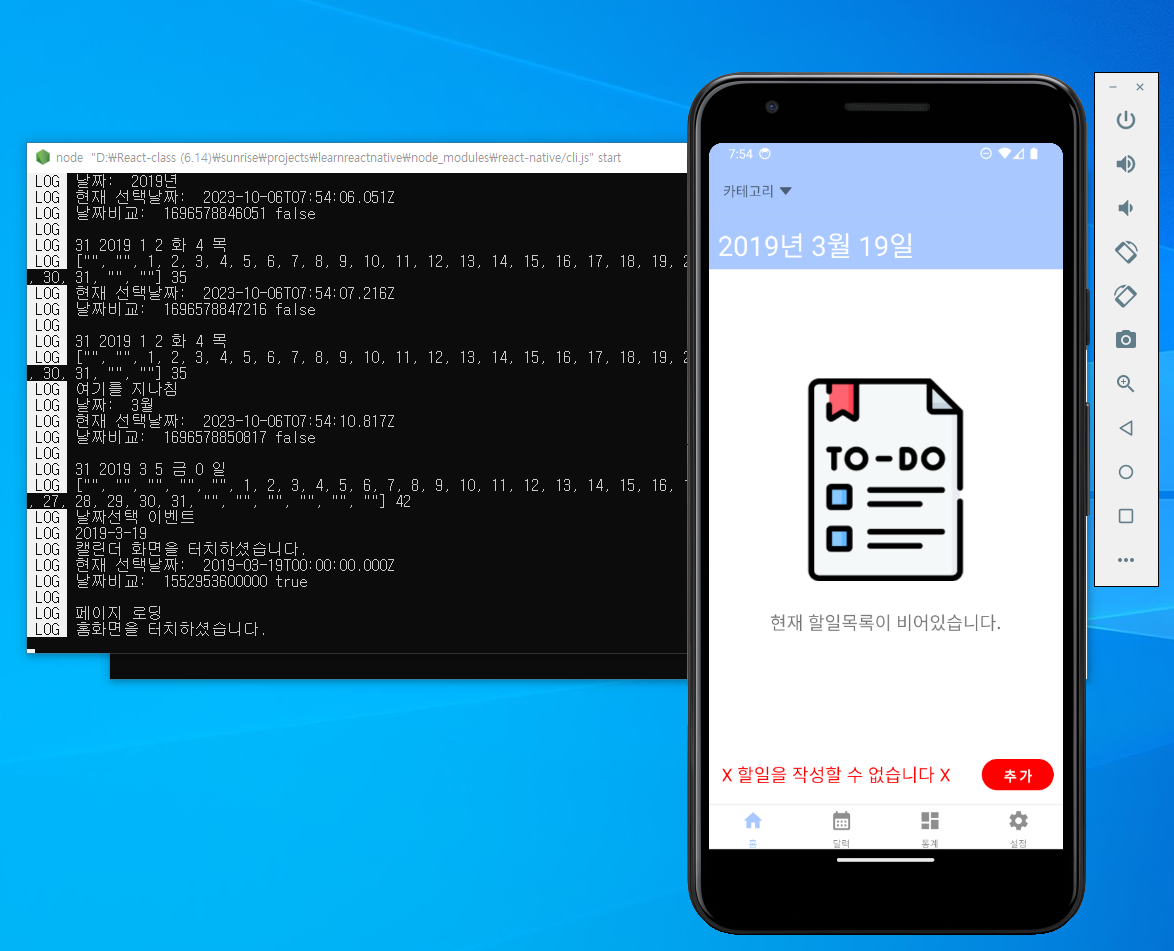
const setDate = (selectedDate) => {
console.log(`${selectedYear}-${selectedMonth}-${selectedDate}`)
navigation.navigate('Home', { date: `${selectedYear}-${selectedMonth}-${selectedDate}` })
}
return (
<SafeAreaView
style={styles.block}
onTouchStart={handleOutSideOfMenu}>
<StatusBar backgroundColor="#a8c8ffff"></StatusBar>
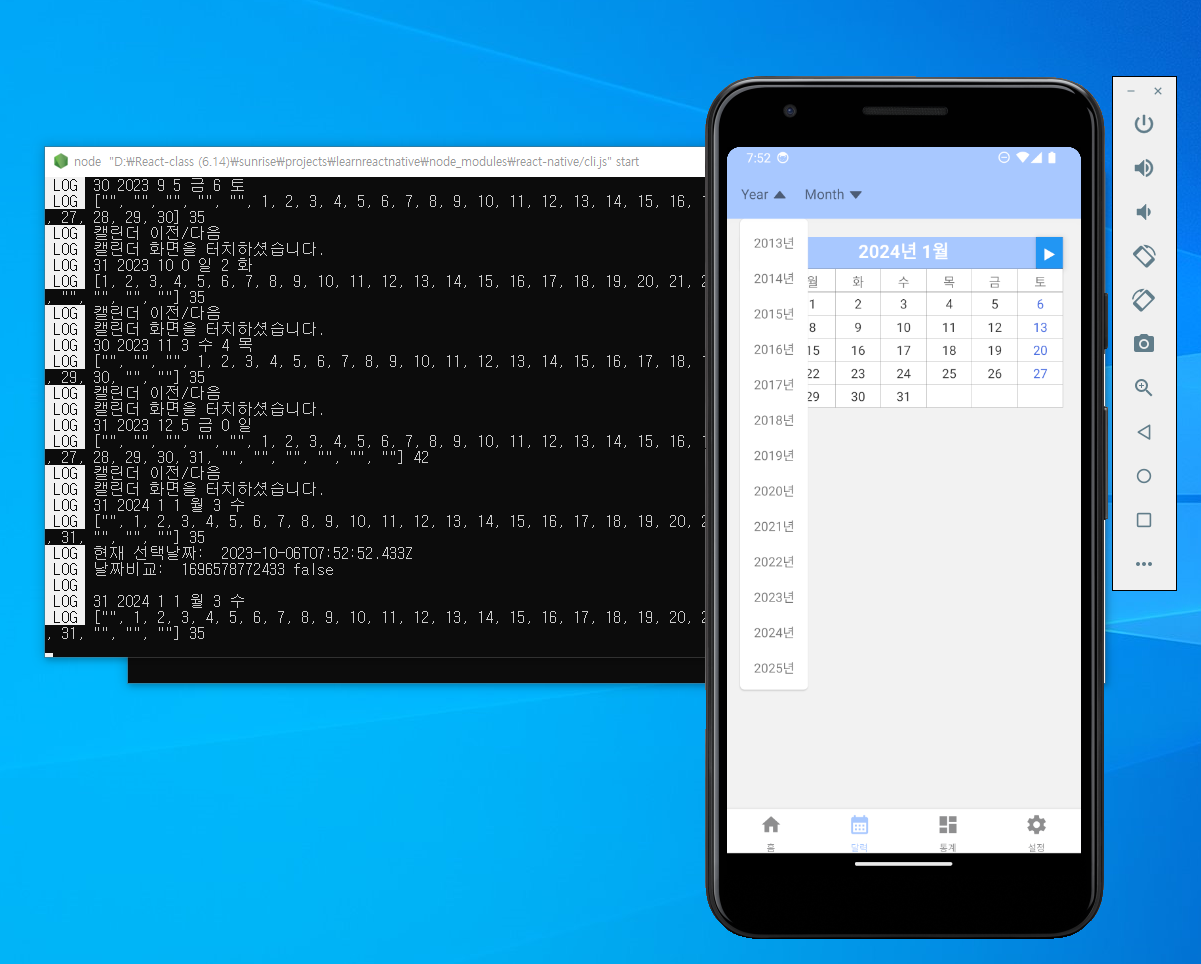
{yearCaret && <DropdownList categories={yearsRange} top={-15} rate={2/3} selectCategory={selectCategory}/>}
{monthCaret && <DropdownList categories={monthRange} top={-15} left={70} selectCategory={selectCategory}/>}
<View style={styles.calendarContainer}>
<View style={styles.calendarHeader} onTouchStart={(e) => { // 터치 시작점 설정 : 캡쳐링 방지 (추가)
console.log('캘린더 이전/다음')
// e.stopPropagation() 버블링 허용 (해당 버튼 클릭전 드롭다운 닫기)
}}>
<Button title="◀︎" onPress={prevMonth}></Button>
<Text style={styles.calendarHeaderText}>{selectedYear}년 {selectedMonth}월</Text>
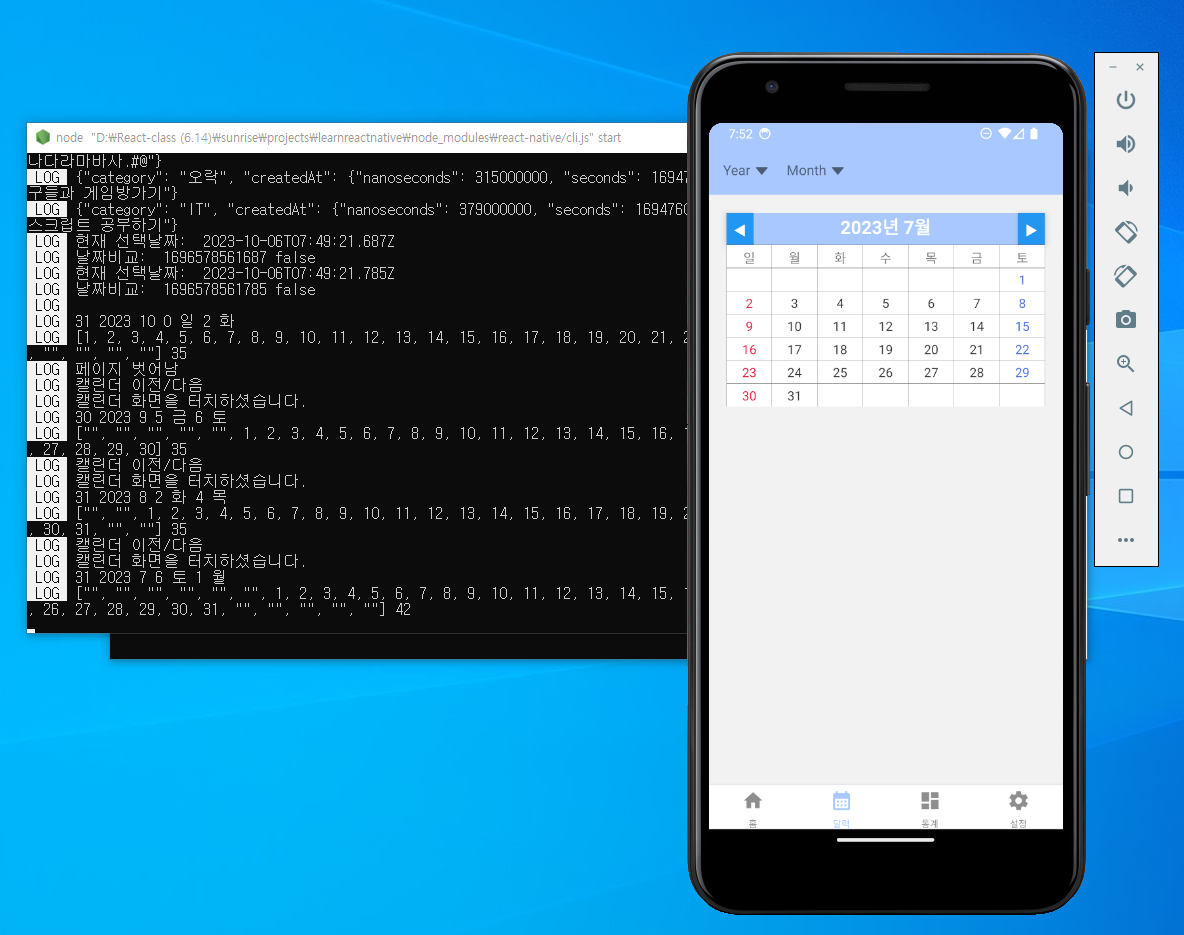
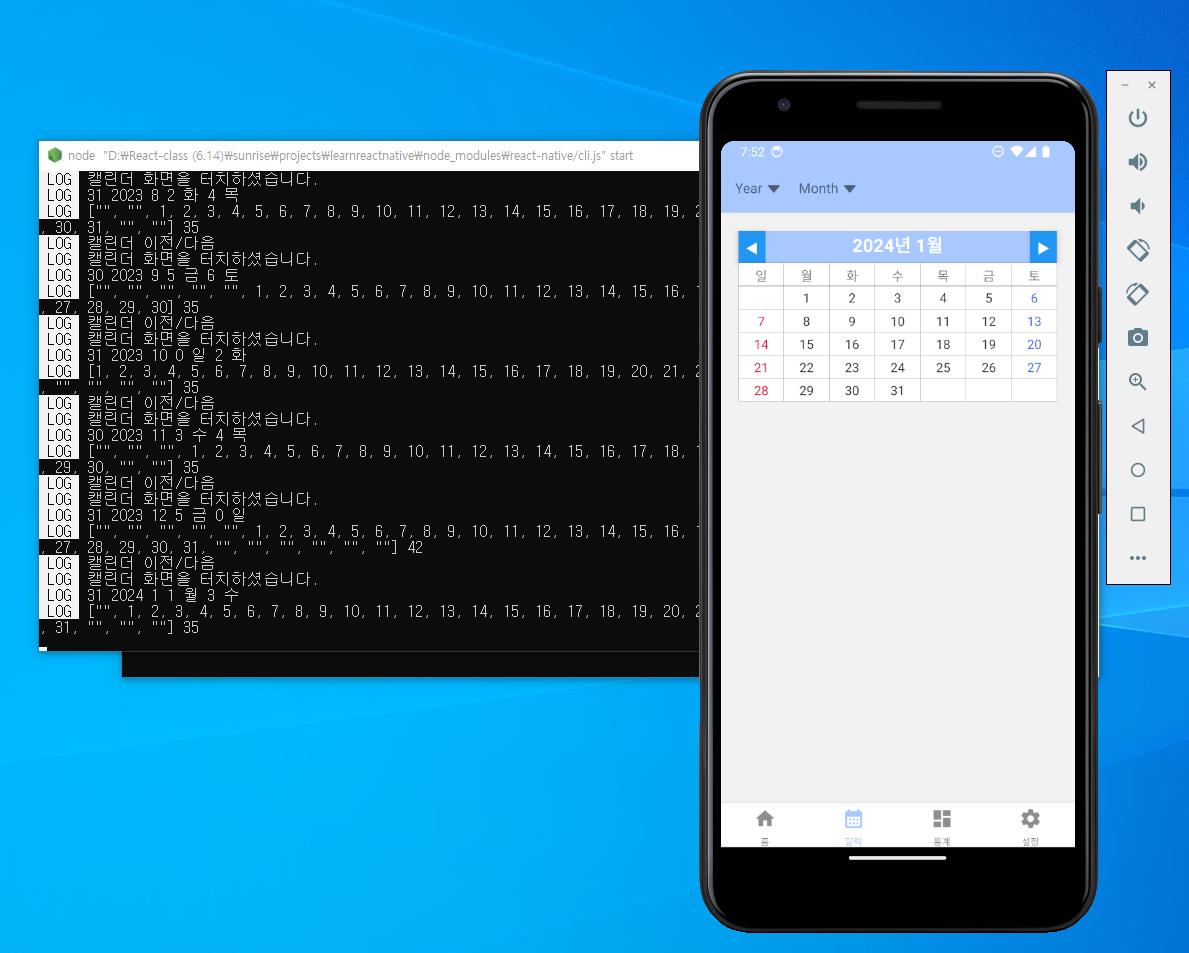
<Button title="▶︎" onPress={nextMonth}></Button>
</View>
<FlatList
data={week}
keyExtractor={item => item}
renderItem={({item}) => (
<View style={styles.day}>
<Text>{item}</Text>
</View>
)}
numColumns={7}
horizontal={false}
/>
<FlatList
data={days}
keyExtractor={item => item}
renderItem={({item}) => (
<View style={[
styles.day,
(selectedYear === today.year && selectedMonth === today.month && item === today.date) && styles.today
]} onTouchStart={(e) => { // 터치 시작점 설정 : 캡쳐링 방지 (추가)
console.log('날짜선택 이벤트')
// e.stopPropagation() // 버블링 허용 (해당 버튼 클릭전 드롭다운 닫기)
setDate(item)
}}>
<Text style={[
styles.weekday,
new Date(selectedYear, selectedMonth - 1, item).getDay() === 0 && styles.sunday,
new Date(selectedYear, selectedMonth - 1, item).getDay() === 6 && styles.saturday]}>{item}</Text>
</View>
)}
numColumns={7}
horizontal={false}
contentContainerStyle={{justifyContent: 'flex-start'}}
/>
</View>
</SafeAreaView>
)
}
const styles = StyleSheet.create({
block: {
flex: 1,
},
calendarContainer: {
width: Dimensions.get('window').width * 0.9, // 80%
backgroundColor: '#777',
marginTop: 20,
marginLeft: 'auto',
marginRight: 'auto',
},
calendarHeader: {
flexDirection: 'row'
},
calendarHeaderText: {
flex: 1,
justifyContent: 'center',
textAlign: 'center',
backgroundColor: '#a8c8ffff',
color: '#fff',
fontSize: 20,
fontWeight: 'bold'
},
day: {
backgroundColor: '#fff',
margin: .2,
flex: 1,
alignItems: 'center',
padding: 3,
},
today: {backgroundColor: '#a8c9ffff'},
weekday: {color: '#333'},
sunday: {color: '#de1738'},
saturday: {color: '#4169e1'}
})
export default React.memo(CalendarScreen)screens > CalendarScreen.js 파일을 위와 같이 수정한다.
import React, { useState, useCallback } from 'react'리액트 훅을 사용하기 위하여 useState, useCallback 함수를 임포트한다.
import {
  SafeAreaView,
  View, Text,
  StyleSheet,
  StatusBar,
  Button,
  FlatList, // 추가
  Dimensions, // 추가
  TouchableWithoutFeedback // 추가
} from 'react-native'
FlatList, Dimensions, TouchableWithoutFeedback 컴포넌트를 사용하기 위하여 임포트한다.
import { getFullCalendar } from '../utils/time'시간을 계산해주는 time 유틸리티 파일에서 getFullCalendar 함수를 임포트한다.
import DropdownList from '../components/DropdownList'년도/월을 선택하는 드롭다운 메뉴를 보여주기 위하여 DropdownList 컴포넌트를 임포트한다.
function CalendarScreen({navigation, yearCaret, setYearCaret, monthCaret, setMonthCaret }){
// 중략
}
드롭다운 버튼을 클릭할때마다 드롭다운 메뉴를 보여주거나 숨기기 위하여 해당 드롭다운의 상태를 의미하는 yearCaret, monthCaret 을 props 로 전달받는다.
const testDate = "2023-09-18"
  const getTodoForDate = () => {
    navigation.navigate('Home', {
      date: testDate
    })
해당 코드는 테스트를 위하여 작성한 코드이며 현재는 더이상 필요하지 않으므로 제거한다.
export const getFullCalendar = (time) => {
    const {year, month, day: date} = getDayWithoutTime(time)
    return {year, month, date, day: time.getDay()}
}
utils > time.js 파일에 위 코드를 추가한다. 해당코드는 특정시점에 대한 년/월/일/요일 정보를 객체형태로 반환해준다. 아래 코드는 CalendarScreen 컴포넌트에서 유틸리티 함수인 getFullCalendar 함수를 사용하는 부분이다.
const today = getFullCalendar(new Date())
const week = ["일", "월", "화", "수", "목", "금", "토"] //일주일
const [selectedYear, setSelectedYear] = useState(today.year) //현재 선택된 연도
const [selectedMonth, setSelectedMonth] = useState(today.month) //현재 선택된 달
사용자가 특정년도나 특정 달을 선택하면 이를 저장하기 위한 상태변수와 상태변수를 변경하기 위한 함수를 정의한다. 초기값으로 현재시점을 기준으로 년도/달을 저장해둔다.
const N = 10 // +-10년 범위
const offset = today.year - N
const yearsRange = Array(2*N).fill(0).map((_, id) => `${id+offset}년`)
const monthRange = Array(12).fill(0).map((_, id) => `${id+1}월`)
드롭다운 메뉴에 보여줄 년도 범위와 달에 대한 범위를 배열로 생성한다. N은 현재년도를 기준으로 드롭다운 메뉴에서 보여줄 년도의 범위이다. N = 10 이고 현재년도가 2023년이면 2023년을 기준으로 +-10년을 드롭다운 메뉴에서 보여준다. N 이 10이라면 총 20개의 년도를 보여주어야 하므로 Array 생성자 함수를 이용하여 2*N 개의 엘리먼트를 생성한다. map 메서드를 이용하여 엘리먼트의 순서에 해당하는 인덱스값(id)를 조회하고 offset 만큼 더하여 yearsRange 변수에 저장한다. 예를 들어 id 값이 0 ~ 19 라고 하면 offset 은 현재년도(2023년)에서 N(10)을 뺀 2013년도이므로 해당값을 offset 으로 하여 0 ~ 19만큼 더하면서 년도범위를 생성한다. 즉, 2013년~2032년이 된다.
const daysOfMonth = new Date(selectedYear, selectedMonth, 0).getDate() //선택된 연도, 달의 마지막 날짜
const day = new Date(selectedYear, selectedMonth - 1, 1).getDay() // 첫째날 요일
const lastDay = new Date(selectedYear, selectedMonth - 1, daysOfMonth).getDay() // 마지막날 요일
const days = [...Array(day).fill(""), ...Array(daysOfMonth).fill(0).map((_, id) => id+1), ...Array(week.length-(lastDay+1)).fill("")]
daysOfMonth 는 사용자가 선택한 년도/월의 마지막 일자를 의미한다. 28일, 30일, 31일 중 하나일 가능성이 다분하다. day 는 선택한 년도/월의 첫째날에 대한 요일(월~일)을 조회한다. lastDady 는 선택한 년도/월의 마지막 날에 대한 요일(월~일)을 조회한다. days 는 앞의 3가지 변수를 이용하여 사용자가 선택한 년도/월의 달력을 생성한다. daysOfMonth 만큼 배열을 생성하고 map 메서드를 이용하여 배열의 인덱스값을 +1 한 상태로 저장한다. 만약 daysOfMonth 가 31이면 id 값의 범위는 0 ~ 30이므로 달력에 대한 날짜를 보여주려면 1을 더해줘야 한다.
앞뒤로 day, week.length - (lastDay+1) 만큼의 배열을 추가적으로 생성하고 빈문자열로 채우는 이유는 1일이 항상 일요일부터 시작하지 않기 때문이다. 추후 빈 문자열 값으로 설정된 엘리먼트는 달력의 빈공간으로 채우기 위함이다. 만약 첫째날이 화요일부터 시작한다면 day 값은 2가 된다. 그러므로 달력을 보여줄때 앞의 2칸은 비어있어야 한다. 또한 week.length - (lastDay+1) 에서 week.length 는 7이다. 그러므로 7 - (lastDay+1) 개만큼 빈 문자열로 된 엘리먼트를 뒤에 추가한다. 예를 들어 마지막 날짜의 요일이 목요일이라면 lastDay 는 4가 된다. 요일은 0부터 시작하지만 실제 목요일은 달력에서 5번째 칸에 표시된다. 그러므로 lastDay 에 1을 더한 값이 실제 달력에 표시되는 위치이다. 이제 7일 중 5개가 가득차있기 때문에 마지막 날짜 뒤에 2칸만 비워져 있으면 된다. 그러므로 7 - (lastDay+1)을 하여 달력 마지막 날짜 뒤의 빈칸을 추가적으로 생성해준다.
const prevMonth = useCallback(() => { //이전 달 보기 보튼
    if (selectedMonth === 1) {
      setSelectedMonth(12)
      setSelectedYear(selectedYear - 1)
    } else {
      setSelectedMonth(selectedMonth - 1)
    }
  }, [selectedMonth])
preMonth 는 달력에서 이전달 보기 버튼을 클릭한 경우 실행되는 함수이다. 이전달을 보려면 현재달에 대한 최신 selectedMonth 값이 있어야 하므로 useCallback 훅을 이용하여 selectedMonth 상태의 최신값을 항상 조회할 수 있도록 두번째 인자로 설정해준다. 사용자가 이전달에 대한 달력을 보기 위하여 버튼을 클릭하면 현재 선택된 달이 1월인지 검사한다. 1월이면 이전년도의 12월을 보여준다. 현재 선택된 달이 1월이 아니라면 selectedMonth 에서 1을 빼서 현재년도의 이전달을 보여주면 된다.
const nextMonth = useCallback(() => { //다음 달 보기 버튼
    if (selectedMonth === 12) {
      setSelectedMonth(1)
      setSelectedYear(selectedYear + 1)
    } else {
      setSelectedMonth(selectedMonth + 1)
    }
  }, [selectedMonth])
nextMonth 는 달력에서 다음달 보기 버튼을 클릭한 경우 실행되는 함수이다. 다음달을 보려면 현재달에 대한 최신 selectedMonth 값이 있어야 하므로 useCallback 훅을 이용하여 selectedMonth 상태의 최신값을 항상 조회할 수 있도록 두번째 인자로 설정해준다. 사용자가 다음달에 대한 달력을 보기 위하여 버튼을 클릭하면 현재 선택된 달이 12월인지 검사한다. 12월이면 다음 년도의 1월을 보여준다. 현재 선택된 달이 12월이 아니라면 selectedMonth 에서 1을 더해서 현재년도의 다음달을 보여주면 된다.
const selectCategory = (item, e) => { // 날짜 드롭다운 선택시 (추가)
    console.log("날짜: ", item)
    const lastChr = item[item.length-1]
    if(lastChr === "년"){
      setSelectedYear(parseInt(item))
    }else if(lastChr === "월"){
      setSelectedMonth(parseInt(item))
    }
    closeDropdown()
  }
사용자가 년도/월을 선택하는 드롭다운 메뉴에서 특정년도나 특정달을 선택할때 실행되는 함수이다. item 은 사용자가 선택한 년도나 달을 의미한다. yeasRange, monthRange 에서 년도/월 숫자 뒤에 "년", "월" 이라는 한글이 포함되어 있다. 즉, 사용자가 선택한 년도/월(item)의 맨 마지막 글자는 숫자가 아닌 "년"/"월" 중 하나이다. 그래서 맨 마지막 글자를 이용하여 사용자가 년도를 선택했는지 달을 선택했는지 구분할 수 있다. 년도를 선택한 경우 setSelectedYear 함수를 이용하여 사용자가 선택한 년도에 대한 상태 (selectedYear) 를 변경후 저장해둔다. 달을 선택한 경우 setSelectedMonth 함수를 이용하여 사용자가 선택한 달에 대한 상태(selectedMonth) 를 변경후 저장해둔다. parseInt 로 감싸준 이유는 년도/월에서 "년"/"월"이라는 한글을 제거하고 숫자만 추출하기 위함이다. 예를 들어 2023년이면 2023만 추출하여 selectedYear 에 저장한다. 마지막으로 드롭다운 메뉴를 닫아준다.
const closeDropdown = () => {
    yearCaret && setYearCaret(false)
    monthCaret && setMonthCaret(false)
}
closeDropdown 는 드롭다운 메뉴를 닫아주는 함수이다. yearCaret 과 monthCaret 을 모두 false 로 설정하여 년도/월에 대한 모든 드롭다운 메뉴를 닫아준다.
const handleOutSideOfMenu = (e) => {
    console.log('캘린더 화면을 터치하셨습니다.')
    closeDropdown()
  }
handleOutSideOfMenu 는 드롭다운 메뉴 이외의 영역을 터치할때 드롭다운 메뉴를 닫아주는 함수이다.
const setDate = (selectedDate) => {
    console.log(`${selectedYear}-${selectedMonth}-${selectedDate}`)
    navigation.navigate('Home', { date: `${selectedYear}-${selectedMonth}-${selectedDate}` })
  }
setDate 는 현재 보이는 달력에서 사용자가 특정날짜를 선택한 경우 실행되는 함수이다. 이때 홈화면으로 페이지가 전환되면서 홈화면으로 사용자가 선택한 날짜(년도/월/일)가 문자열 형태로 전달된다. 그러면 해당 날짜의 할일목록을 데이터베이스에서 조회한 다음 홈화면에서 보여준다.
<SafeAreaView
      style={styles.block}
      onTouchStart={handleOutSideOfMenu}>
//중략
</SafeAreaView>
캘린더 화면에서 드롭다운 이외의 영역을 터치했을때 드롭다운 메뉴를 닫아줄 수 있도록 onTouchStart 속성에 handleOutSideOfMenu 함수를 등록한다.
<View>
        <Text>캘린더</Text>
        <Button title="날짜선택" onPress={getTodoForDate}/>
해당코드는 테스트를 위해 임시로 작성한 것으로 더이상 필요없기 때문에 삭제한다.
{yearCaret && <DropdownList categories={yearsRange} top={-15} rate={2/3} selectCategory={selectCategory}/>}
{monthCaret && <DropdownList categories={monthRange} top={-15} left={70} selectCategory={selectCategory}/>}
년도/월에 대한 각각의 드롭다운 메뉴를 화면에 보여주기 위하여 위와 같이 작성한다. yearCaret 상태가 true 이면 년도에 대한 드롭다운 메뉴를 화면에 보여주고, monthCaret 상태가 true 이면 달에 대한 드롭다운 메뉴를 보여준다. categories 속성에는 드롭다운 메뉴에서 보여줄 옵션메뉴를 배열형태로 전달한다. top, left 는 드롭다운 메뉴의 위치를 설정한다. rate 속성은 드롭다운 메뉴의 최대높이를 설정한다. selectCategory 속성은 사용자가 드롭다운에서 년도/월을 선택할때 실행된다.
<View style={styles.calendarContainer}>
        <View style={styles.calendarHeader} onTouchStart={(e) => { // 터치 시작점 설정 : 캡쳐링 방지 (추가)
                console.log('캘린더 이전/다음')
                // e.stopPropagation() 버블링 허용 (해당 버튼 클릭전 드롭다운 닫기)
              }}>
          <Button title="◀︎" onPress={prevMonth}></Button>
          <Text style={styles.calendarHeaderText}>{selectedYear}년 {selectedMonth}월</Text>
          <Button title="▶︎" onPress={nextMonth}></Button>
        </View>

        <FlatList
              data={week}
              keyExtractor={item => item}
              renderItem={({item}) => (
                <View style={styles.day}>
                  <Text>{item}</Text>
                </View>
              )}
              numColumns={7}
              horizontal={false}
            />
          <FlatList
              data={days}
              keyExtractor={item => item}
              renderItem={({item}) => (
                <View style={[
                                styles.day,
                                (selectedYear === today.year && selectedMonth === today.month && item === today.date) && styles.today
                            ]} onTouchStart={(e) => { // 터치 시작점 설정 : 캡쳐링 방지 (추가)
                  console.log('날짜선택 이벤트')
                  // e.stopPropagation() // 버블링 허용 (해당 버튼 클릭전 드롭다운 닫기)
                  setDate(item)
                }}>
                    <Text style={[
                      styles.weekday,
                      new Date(selectedYear, selectedMonth - 1, item).getDay() === 0 && styles.sunday,
                      new Date(selectedYear, selectedMonth - 1, item).getDay() === 6 && styles.saturday]}>{item}</Text>
                </View>
              )}
              numColumns={7}
              horizontal={false}
              contentContainerStyle={{justifyContent: 'flex-start'}}
            />

      </View>
캘런더 화면에서 달력을 보여주는 부분이다.
<View style={styles.calendarHeader} onTouchStart={(e) => { // 터치 시작점 설정 : 캡쳐링 방지 (추가)
        console.log('캘린더 이전/다음')
        // e.stopPropagation() 버블링 허용 (해당 버튼 클릭전 드롭다운 닫기)
      }}>
  <Button title="◀︎" onPress={prevMonth}></Button>
  <Text style={styles.calendarHeaderText}>{selectedYear}년 {selectedMonth}월</Text>
  <Button title="▶︎" onPress={nextMonth}></Button>
</View>
해당코드는 달력의 헤더(상단 부분)에 보여줄 뷰이다. 달력 헤더에 현재 사용자가 선택한 년도/월을 보여준다. 사용자가 이전/다음 달에 대한 달력을 조회할 수 있도록 이전/다음달 보기 버튼을 추가한다. 그리고 각각 해당 버튼을 눌렀을때 prevMonth, nextMonth 함수가 실행될 수 있도록 이벤트핸들러 함수를 등록한다.
초반에는 버블링을 방지하기 위하여 e.stopPropagation 을 설정하였으나 캘린더 화면까지 터치 이벤트가 전파되는 것이 낫겠다는 생각으로 주석처리하였다. 이유는 사용자가 이전/다음달 보기 버튼을 클릭할때 만약 드롭다운 메뉴가 열려있고, e.stopPropagation 을 실행한다면 이전/다음달은 볼 수 있지만, 터치 이벤트가 캘린더 화면까지 전파되지 않아 기존에 열려있는 드롭다운 메뉴가 닫히지 않게 된다. 즉, handleOutSideOfMenu 함수가 실행되지 않는다.
<FlatList
      data={week}
      keyExtractor={item => item}
      renderItem={({item}) => (
        <View style={styles.day}>
          <Text>{item}</Text>
        </View>
      )}
      numColumns={7}
      horizontal={false}
    />
week 배열을 이용하여 달력에서 요일을 보여주는 코드이다. numColumns={7} 과 horizontal={false}를 설정하면 요일에 대한 엘리먼트 7개를 수평으로 나열해서 보여준다.
<FlatList
              data={days}
              keyExtractor={item => item}
              renderItem={({item}) => (
                <View style={[
                                styles.day,
                                (selectedYear === today.year && selectedMonth === today.month && item === today.date) && styles.today
                            ]} onTouchStart={(e) => { // 터치 시작점 설정 : 캡쳐링 방지 (추가)
                  console.log('날짜선택 이벤트')
                  // e.stopPropagation() // 버블링 허용 (해당 버튼 클릭전 드롭다운 닫기)
                  setDate(item)
                }}>
                    <Text style={[
                      styles.weekday,
                      new Date(selectedYear, selectedMonth - 1, item).getDay() === 0 && styles.sunday,
                      new Date(selectedYear, selectedMonth - 1, item).getDay() === 6 && styles.saturday]}>{item}</Text>
                </View>
              )}
              numColumns={7}
              horizontal={false}
              contentContainerStyle={{justifyContent: 'flex-start'}}
            />
실제 달력에서 날짜를 보여주는 부분이다. 조금전에 생성해둔 days 배열을 FlatList 컴포넌트에 전달하여 각각의 날짜를 보여줄 엘리먼트를 생성한다.
<View style={[
                styles.day,
                (selectedYear === today.year && selectedMonth === today.month && item === today.date) && styles.today
             ]}
      onTouchStart={(e) => { // 터치 시작점 설정 : 캡쳐링 방지 (추가)
          console.log('날짜선택 이벤트')
          // e.stopPropagation() // 버블링 허용 (해당 버튼 클릭전 드롭다운 닫기)
          setDate(item)
}}>
사용자가 선택한 년도/월에 현재날짜가 있으면 배경색을 다르게 표시해준다. 예를 들어 현재날짜가 2023년 10월 6일이고 사용자가 선택한 년도/월이 2023년 10월이면 6일은 배경색을 다르게 표시해서 오늘날짜를 구분해준다. 사용자가 달력에서 특정날짜를 선택하면 setDate 함수가 실행되어 홈화면으로 이동한다.
초반에는 버블링을 방지하기 위하여 e.stopPropagation 을 설정하였으나 캘린더 화면까지 터치 이벤트가 전파되는 것이 낫겠다는 생각으로 주석처리하였다. 이유는 사용자가 달력에서 특정날짜를 선택할때 만약 드롭다운 메뉴가 열려있고, e.stopPropagation 을 실행한다면 홈화면으로 이동하지만, 터치 이벤트가 캘린더 화면까지 전파되지 않아 기존에 열려있는 드롭다운 메뉴가 닫히지 않게 된다. 즉, handleOutSideOfMenu 함수가 실행되지 않는다. 그럼 나중에 홈화면에서 다시 캘린더 화면으로 돌아오면 드롭다운 메뉴가 열린 상태로 남아있게 된다.
<Text style={[
  styles.weekday,
  new Date(selectedYear, selectedMonth - 1, item).getDay() === 0 && styles.sunday,
  new Date(selectedYear, selectedMonth - 1, item).getDay() === 6 && styles.saturday]}>
  	{item}
</Text>
new Date(), getDay() 함수를 이용하여 달력에서 보여지는 날짜의 요일(월~일)을 조회한다. 0 이면 일요일이므로 일요일은 날짜 색상을 붉은색으로 보여준다. 6이면 토요일이므로 날짜 색상을 파란색으로 보여준다.
numColumns={7}
horizontal={false}
contentContainerStyle={{justifyContent: 'flex-start'}}
달력에 들어가는 날짜도 요일과 마찬가지로 위와 같이 설정하여 수평으로 엘리먼트를 나열한다.
const styles = StyleSheet.create({
  block: {
    flex: 1,
  },
  calendarContainer: {    // 달력 컨테이너 (전체화면 너비의 80% 너비로 설정)
    width: Dimensions.get('window').width * 0.9, // 80%
    backgroundColor: '#777',
    marginTop: 20,
    marginLeft: 'auto',
    marginRight: 'auto',
  },
  calendarHeader: {   // 달력 헤더(상단부분)
    flexDirection: 'row'
  },
  calendarHeaderText: { // 달력 헤더의 텍스트 영역
    flex: 1,
    justifyContent: 'center',
    textAlign: 'center',
    backgroundColor: '#a8c8ffff',
    color: '#fff',
    fontSize: 20,
    fontWeight: 'bold'
  },
  day: {   // 요일과 날짜를 표시하는 달력의 한칸
    backgroundColor: '#fff',
    margin: .2,
    flex: 1, // 7칸을 균등하게 분배하기 위함
    alignItems: 'center',
    padding: 3,
  },
  today: {backgroundColor:  '#a8c9ffff'}, // 현재날짜의 배경색 설정
  weekday: {color: '#333'},  // 모든 날짜의 글자색상
  sunday: {color: '#de1738'}, // 일요일에 해당하는 날짜의 글자색상
  saturday: {color: '#4169e1'} // 토요일에 해당하는 날짜의 글자색상
})
스타일링 부분은 주석처리를 참고하기 바란다.
export default React.memo(CalendarScreen)렌더링 최적화를 위하여 React.memo 로 컴포넌트를 감싸준다.
* 캘린더 화면 테스트하기


'프로젝트 > 할일목록 앱 (RN)' 카테고리의 다른 글
| 9. 소셜로그인 기능 - 카카오 로그인 구현하기 (0) | 2023.10.19 |
|---|---|
| 8. 통계 화면 - 바 그래프로 보여주기 (0) | 2023.10.16 |
| 6. 할일목록 수정 및 삭제 기능 만들기 (0) | 2023.09.27 |
| 5. 할일목록 날짜별로 필터링해서 보여주기 & 할일목록 최신순 정렬해서 보여주기 (0) | 2023.09.25 |
| 4. 파이어베이스 데이터베이스에 할일목록 저장하고 불러오기 (0) | 2023.09.14 |