
Ref와 DOM – React
A JavaScript library for building user interfaces
ko.reactjs.org
* 요소 참조의 개념
자바스크립트에서 특정 DOM 을 선택해야 할때 getElementById 나 querySelector 함수를 사용한다. 리액트에서는 대부분 state 를 사용하여 DOM 을 제어하지만 특별한 경우 DOM 을 직접 선택해야 하는 경우도 있다. 예를 들면, 버튼을 직접 클릭하게 한다거나 입력창에 포커스를 줘야 하는 등이다.
* 요소 참조하는 방법
클래스형 컴포넌트
import React, { Component } from 'react'

class CustomInput extends Component {
    constructor(props){
        super(props)
        this.textInput = React.createRef() // ref 생성하기
    }
    focusInput = () => {
    	console.log(this.textInput.current)
        this.textInput.current.focus() // ref 사용하기
    }
    render(){
        return (
            <>
                <input type="text" ref={this.textInput}></input>  {/* ref 설정하기 */}
                <button onClick={this.focusInput}>focus input</button>
            </>
        )
    }
}

export default CustomInput
CustomInput.js 파일을 생성하고 위 코드를 작성하자! 요소 참조를 하는 절차는 크게 3단계로 나뉜다.
this.textInput = React.createRef() // ref 생성하기생성자 함수 안에서 createRef 메서드를 사용하여 ref 를 생성한다.
<input type="text" ref={this.textInput}></input> {/* ref 설정하기 */}제어하고자 하는 DOM 요소에 ref 를 설정한다.
this.textInput.current.focus() // ref 사용하기이벤트핸들러 함수에서 설정한 ref 요소를 가져와서 제어한다. this.textInput.current 는 ref 를 설정한 DOM 요소를 가리킨다.
import './App.css';
import { Component } from 'react';
import CustomInput from './CustomInput'

class App extends Component {
  render(){
    return (
      <div className="App">
        <CustomInput></CustomInput>
      </div>
    );
  }
}

export default App;
App.js 파일에서 CustomInput 컴포넌트를 임포트하여 사용한다.
함수형 컴포넌트
import React, { useRef } from 'react'

function CustomInput(props) {
    const textInput = useRef(null) // ref 생성하기
    const focusInput = () => {
        console.log(textInput.current)
        textInput.current.focus() // ref 사용하기
    }

    return (
        <>
            <input type="text" ref={textInput}></input>  {/* ref 설정하기 */}
            <button onClick={focusInput}>focus input</button>
        </>
    )

}

export default CustomInput
CustomInput.js 파일을 위와 같이 수정하자! 함수형 컴포넌트에서는 ref 를 생성할때 createRef 대신 useRef 메서드를 사용한다. 나머지 내용은 클래스형 컴포넌트에서 ref 를 사용하는 것과 동일하다.
* 여러개의 요소에 요소참조 적용하기
import React, { Component } from 'react'

class CustomInput extends Component {
    constructor(props){
        super(props)
        this.textInput = ["Name", "Password", "ConfirmPassword"]
    }
    focusInput = (id, e) => {
    	// console.log(this.textInput[id].current, e.target)
        // this.textInput[id].current.focus() // ref 사용하기

        for(let input of this.textInput){
            input.current.style.backgroundColor = "white"
        }
        this.textInput[id].current.style.backgroundColor = "red"
    }
    render(){
        // console.log(new Array(3).fill(0))
        return (
            <>
                {this.textInput.map((labelName, id) => {
                    this.textInput[id] = React.createRef()
                    return (
                        <div key={id}>
                            <label>
                                {labelName}
                                <input type="text" ref={this.textInput[id]} onClick={(e) => this.focusInput(id, e)}></input>
                            </label>
                        </div>
                    )
                })}
                {/* <button onClick={this.focusInput}>focus input</button> */}
            </>
        )
    }
}

export default CustomInput
CustomInput.js 파일을 위와 같이 수정하자!
constructor(props){
    super(props)
    this.textInput = ["Name", "Password", "ConfirmPassword"]
}
입력창 각각에 대하여 레이블을 설정하고, 참조되는 요소를 저장하기 위하여 위와 같이 this.textInput 이라는 멤버변수를 추가한다.
render(){
        // console.log(new Array(3).fill(0))
        return (
            <>
                {this.textInput.map((labelName, id) => {
                    this.textInput[id] = React.createRef()
                    return (
                        <div key={id}>
                            <label>
                                {labelName}
                                <input type="text" ref={this.textInput[id]} onClick={(e) => this.focusInput(id, e)}></input>
                            </label>
                        </div>
                    )
                })}
                {/* <button onClick={this.focusInput}>focus input</button> */}
            </>
        )
    }
render 메서드에서는 this.textInput 배열을 map 메서드로 순회하면서 각각의 입력창에 레이블을 설정하고, this.textInput 배열에는 React.createReft() 메서드를 이용하여 요소참조를 위한 레퍼런스를 추가한다. 또한, 각 input 요소의 ref 속성에 생성한 레퍼런스를 설정한다. 마지막으로 레이블 갯수만큼 입력창을 화면에 보여준다.
focusInput = (id, e) => {
    	// console.log(this.textInput[id].current, e.target)
        // this.textInput[id].current.focus() // ref 사용하기

        for(let input of this.textInput){
            input.current.style.backgroundColor = "white"
        }
        this.textInput[id].current.style.backgroundColor = "red"
    }
각 입력창을 클릭하면 해당 입력창의 배경색은 붉은색으로 설정되고 나머지 입력창의 배경색은 초기화된다.
import React, { useRef } from 'react'

function CustomInput(props){
    const textInput = useRef(["Name", "Password", "ConfirmPassword"])
    console.log(textInput.current)

    const focusInput = (id, e) => {
    	// console.log(this.textInput[id].current, e.target)
        // this.textInput[id].current.focus() // ref 사용하기

        console.log(textInput.current)
        for(let input of textInput.current){
            console.log(input.current)
            input.current.style.backgroundColor = "white"
        }
        textInput.current[id].current.style.backgroundColor = "red"
    }

    return (
        <>
            {textInput.current.map((labelName, id) => {
                textInput.current[id] = React.createRef()
                return (
                    <div key={id}>
                        <label>
                            {labelName}
                            <input type="text" ref={textInput.current[id]} onClick={(e) => focusInput(id, e)}></input>
                        </label>
                    </div>
                )
            })}
            {/* <button onClick={this.focusInput}>focus input</button> */}
        </>
    )

}

export default CustomInput
CustomInput.js 파일을 위와 같이 수정하자!
const textInput = useRef(["Name", "Password", "ConfirmPassword"])
console.log(textInput.current)
useRef 에 배열을 전달하면 textInput.current 값이 배열이 된다.
return (
        <>
            {textInput.current.map((labelName, id) => {
                textInput.current[id] = React.createRef()
                return (
                    <div key={id}>
                        <label>
                            {labelName}
                            <input type="text" ref={textInput.current[id]} onClick={(e) => focusInput(id, e)}></input>
                        </label>
                    </div>
                )
            })}
            {/* <button onClick={this.focusInput}>focus input</button> */}
        </>
    )
this 를 사용하지 않은 것을 제외하면 나머지 코드 패턴은 클래스 컴포넌트와 유사하다. 그러므로 설명은 생략한다.
const focusInput = (id, e) => {
    	// console.log(this.textInput[id].current, e.target)
        // this.textInput[id].current.focus() // ref 사용하기

        console.log(textInput.current)
        for(let input of textInput.current){
            console.log(input.current)
            input.current.style.backgroundColor = "white"
        }
        textInput.current[id].current.style.backgroundColor = "red"
    }
input 은 React.createRef() 메서드로 생성한 요소의 참조이다. React.createRef() 도 마찬가지로 current 프로퍼티에 참조되는 요소를 저장하기 때문에 input.current 가 참조되는 요소를 의미한다.
* 컴포넌트에 요소참조 설정하기
컴포넌트에 요소참조를 설정하면 컴포넌트 내부의 멤버변수나 메서드를 컴포넌트 외부에서 사용할 수 있다. 아래 코드는 컴포넌트의 메서드를 호출하여 스크롤하는 예제이다.
import React, { Component } from "react";
import "./App.css";
import ScrollBox from "./ScrollBox";

class App extends Component {
  constructor(props){
    super(props)
    this.scrollBox = React.createRef()
  }
  moveBox = () => {
    console.log(this.scrollBox)
    console.log(this.scrollBox.current)
    this.scrollBox.current.ScrollToBottom()
  }
  render() {
    return (
      <div>
        <ScrollBox ref={this.scrollBox} />
        <button onClick={this.moveBox}>맨 밑으로</button>
      </div>
    );
  }
}

export default App;
App.js 파일을 위와 같이 작성하자! ScrollBox 컴포넌트에 ref 를 설정하고, ScrollBox 컴포넌트의 ScrollToBottom 메서드를 사용하여 스크롤한다.
import React, { Component } from "react";

class ScrollBox extends Component {
  constructor(props){
    super(props)
    this.box = React.createRef()
  }
  ScrollToBottom = () => {
    const { scrollHeight, clientHeight } = this.box.current;
    this.box.current.scrollTop = scrollHeight - clientHeight;
  }

  render() {
    const style = {
      border: "1px solid orange",
      height: "500px",
      width: "500px",
      overflow: "auto",
      position: "relative",
      scrollBehavior: "smooth"
    }

    const innerStyle = {
      width: "100%",
      height: "1000px",
      background: "linear-gradient(white, orange)",
    }

    return (
      <div
        style={style}
        ref={this.box}
      >
        <div style={innerStyle}></div>
      </div>
    );
  }
}

export default ScrollBox;
ScrollBox.js 파일을 생성하고 위와 같이 작성하자! ScrollBox 컴포넌트 내부에서는 스크롤을 적용할 div 요소에 ref 를 설정한다.
import React, { useRef } from "react";
function ScrollBox() {
const box = useRef(null)
const ScrollToBottom = () => {
const { scrollHeight, clientHeight } = box.current;
box.current.scrollTop = scrollHeight - clientHeight;
}
const style = {
border: "1px solid orange",
height: "500px",
width: "500px",
overflow: "auto",
position: "relative",
scrollBehavior: "smooth"
}
const innerStyle = {
width: "100%",
height: "1000px",
background: "linear-gradient(white, orange)",
}
return (
<div
style={style}
ref={box}
>
<div style={innerStyle}></div>
</div>
);
}
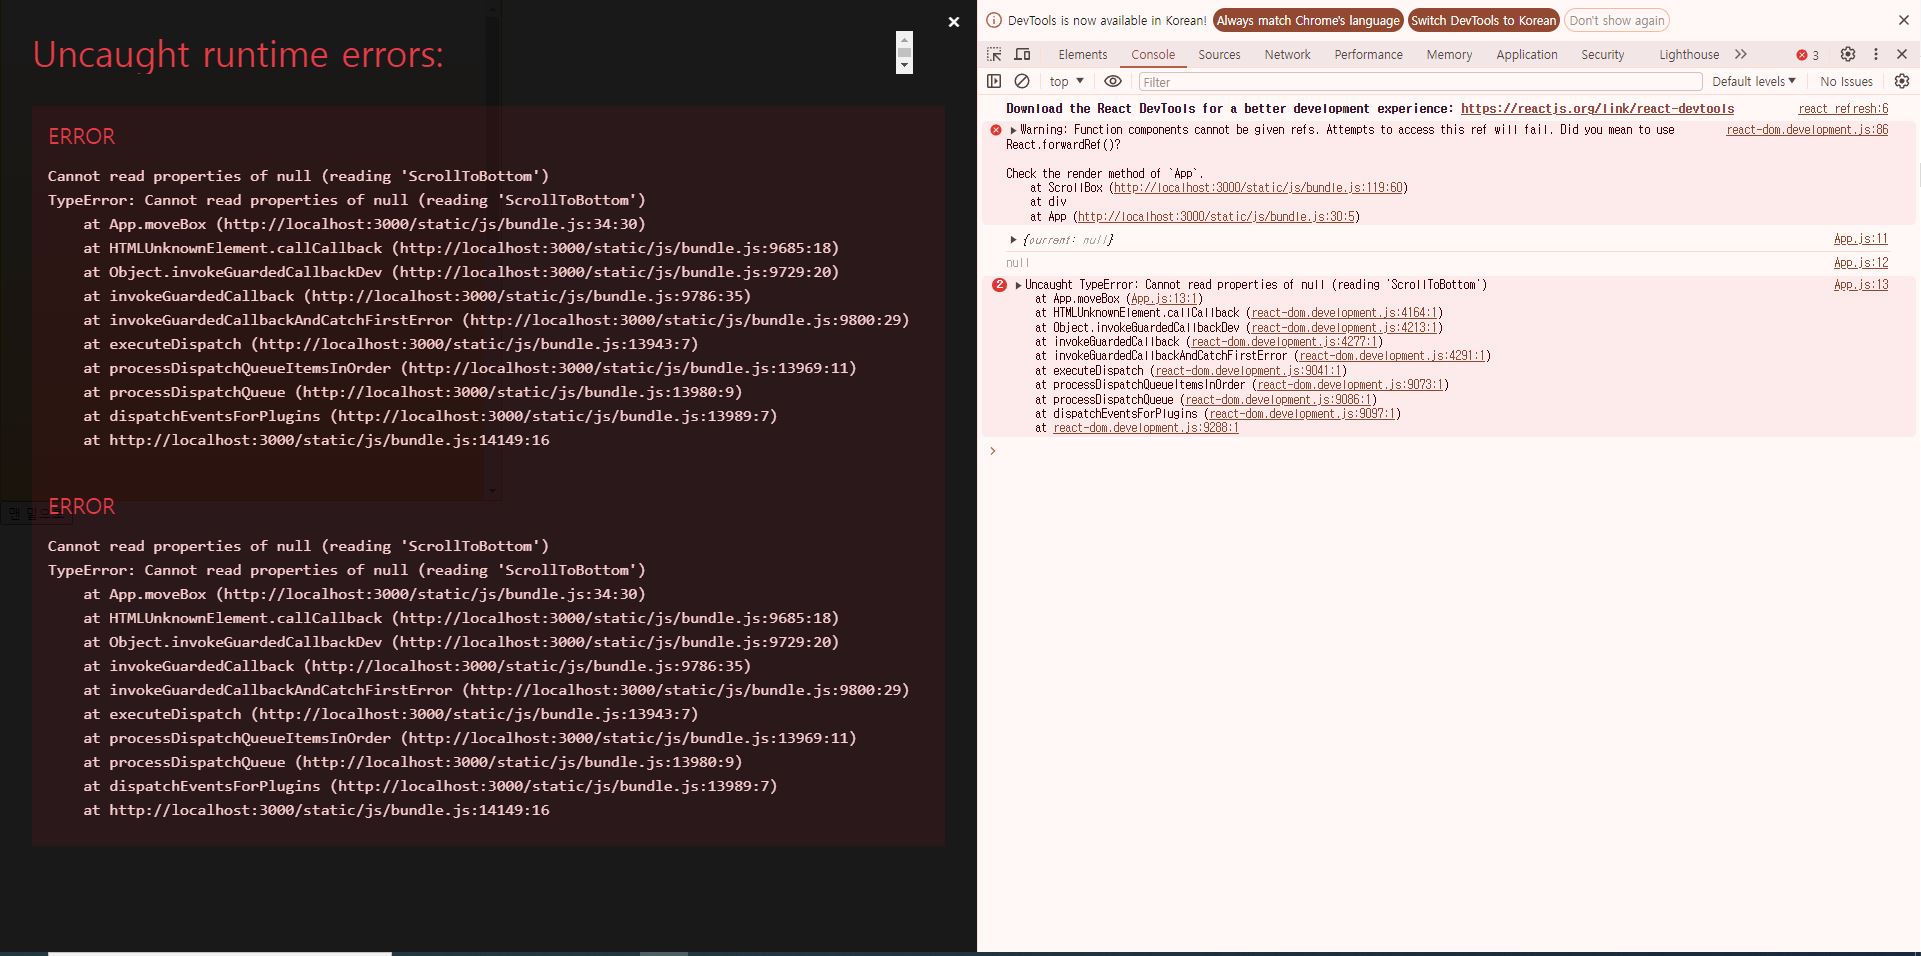
export default ScrollBox;ScrollBox 를 함수형 컴포넌트로 변환하고 요소참조를 사용하려고 하면 아래와 같은 에러가 발생한다.
import React, { Component } from "react";
import "./App.css";
import ScrollBox from "./ScrollBox";

class App extends Component {
  constructor(props){
    super(props)
    this.scrollBox = React.createRef()
  }
  moveBox = () => {
    console.log(this.scrollBox)
    console.log(this.scrollBox.current)
    const { scrollHeight, clientHeight } = this.scrollBox.current;
    this.scrollBox.current.scrollTop = scrollHeight - clientHeight;
  }
  render() {
    return (
      <div>
        <ScrollBox ref={this.scrollBox} />
        <button onClick={this.moveBox}>맨 밑으로</button>
      </div>
    );
  }
}

export default App;
App.js 파일을 위와 같이 수정하자! ScrollBox 컴포넌트는 이제 함수이므로 ScrollToBottom 메서드는 사용할 수 없다. moveBox 메서드에서 this.scrollBox 는 ScrollBox 컴포넌트 내부의 div 요소를 의미한다. 그러므로 ScrollBox 컴포넌트 외부에서 직접 컴포넌트 내부의 div 요소를 제어하도록 수정하였다.
import React, { forwardRef, useRef } from "react";

const ScrollBox = forwardRef((props, ref) => {

    const style = {
        border: "1px solid orange",
        height: "500px",
        width: "500px",
        overflow: "auto",
        position: "relative",
        scrollBehavior: "smooth"
    }

    const innerStyle = {
        width: "100%",
        height: "1000px",
        background: "linear-gradient(white, orange)",
    }

    return (
      <div
        style={style}
        ref={ref}
      >
        <div style={innerStyle}></div>
      </div>
    );

})

export default ScrollBox;
ScrollBox 컴포넌트를 위와 같이 수정하자! forwardRef 함수는 컴포넌트 외부에서 전달된 ref 값을 props 로 전달받을 수 있게 한다. 전달받은 ref 값은 참조하고자 하는 (제어하려는) 요소에 ref 속성으로 설정하면 된다. 이렇게 하면 ScrollBox 컴포넌트 외부에서 해당 요소에 직접 접근할 수 있다.
* 컴포넌트 내부에서 useRef 를 변수처럼 사용하기
import React, { Component } from "react";
import "./App.css";
import Counter from "./Counter";

class App extends Component {
  render(){
    return (
      <Counter/>
    )
  }
}

export default App;
App.js 파일을 위와 같이 작성하자! Counter 컴포넌트를 임포트하고 사용한다.
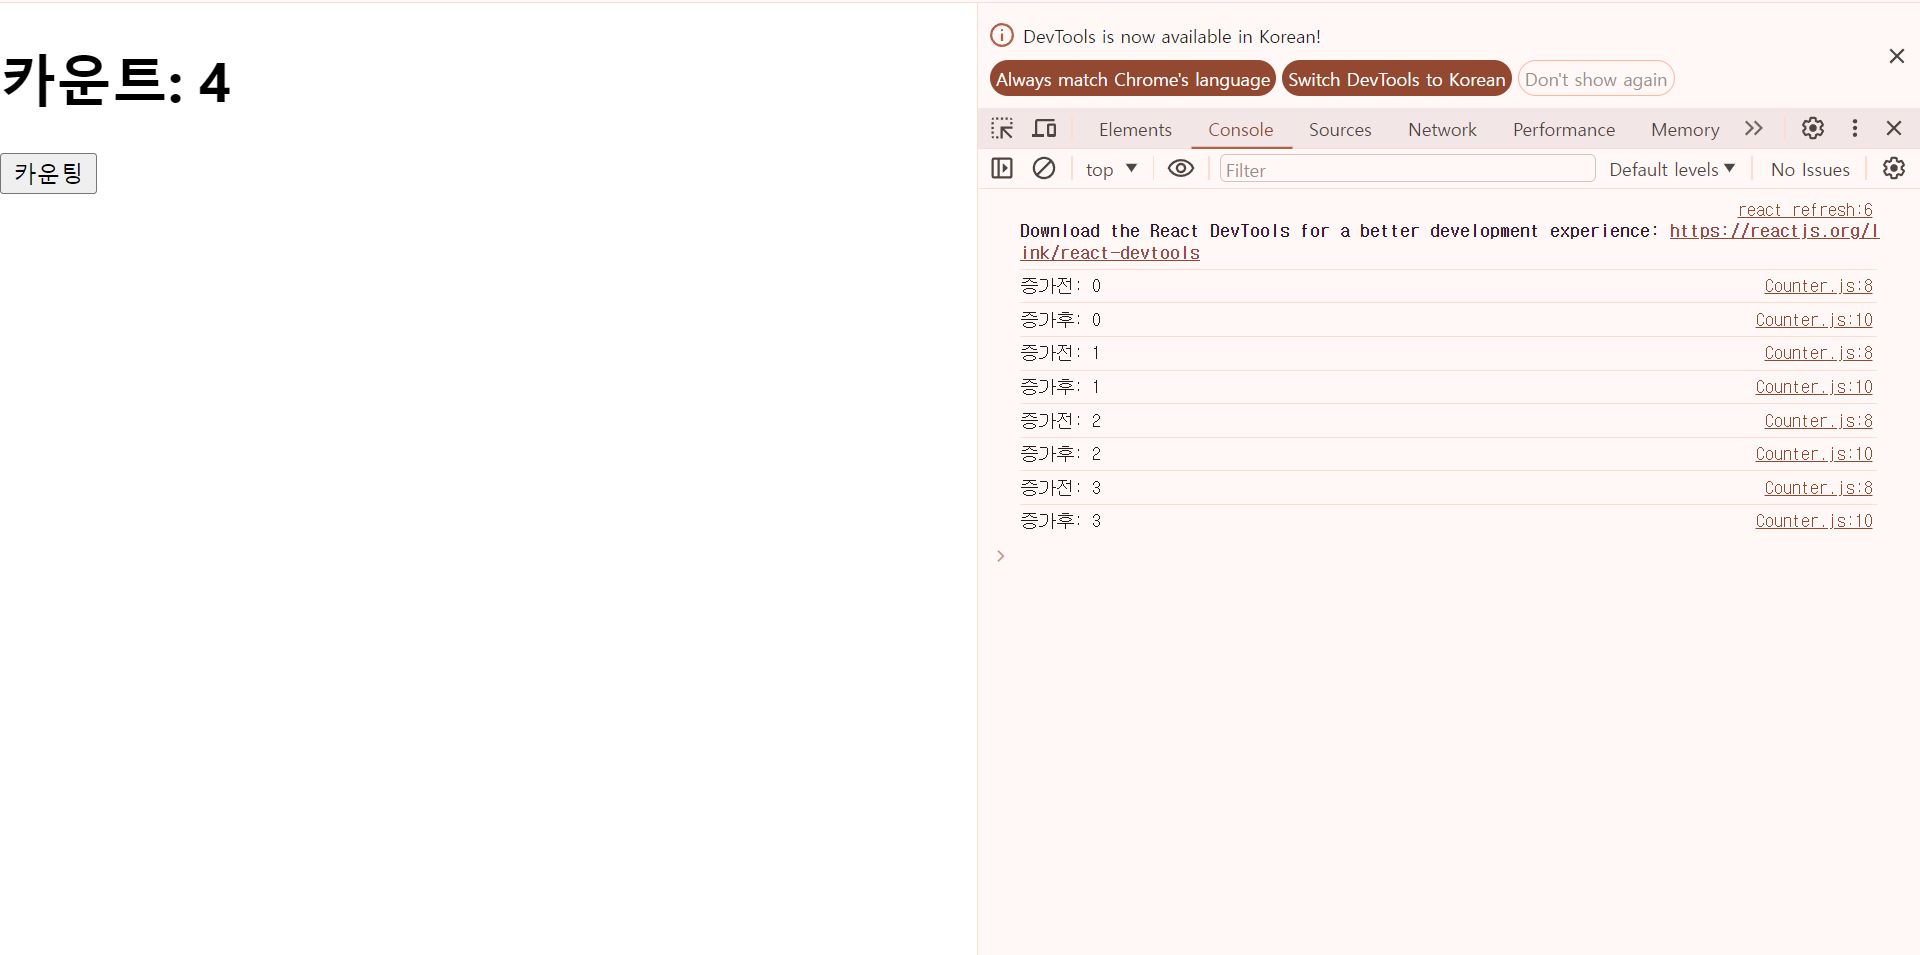
import React, { Component } from 'react';

class Counter extends Component {
    state = {
        count: 0
    }
    increase = () => {
        console.log(`증가전: ${this.state.count}`)
        this.setState({count: this.state.count + 1})
        console.log(`증가후: ${this.state.count}`)
    }
    render() {
        const {count} = this.state
        return (
            <div>
            <h1>카운트: {count}</h1>
            <button onClick={this.increase}>카운팅</button>
            </div>
        );
    }
}

export default Counter;
Counter.js 파일을 위와 같이 작성하자! 숫자를 카운팅하는 기본적인 동작을 하는 컴포넌트이다. state 는 setState 메서드를 호출하여 상태를 변경하면 화면을 새로 그린다. 또한, setState 메서드는 비동기이므로 값이 곧바로 증가하지도 않는다.
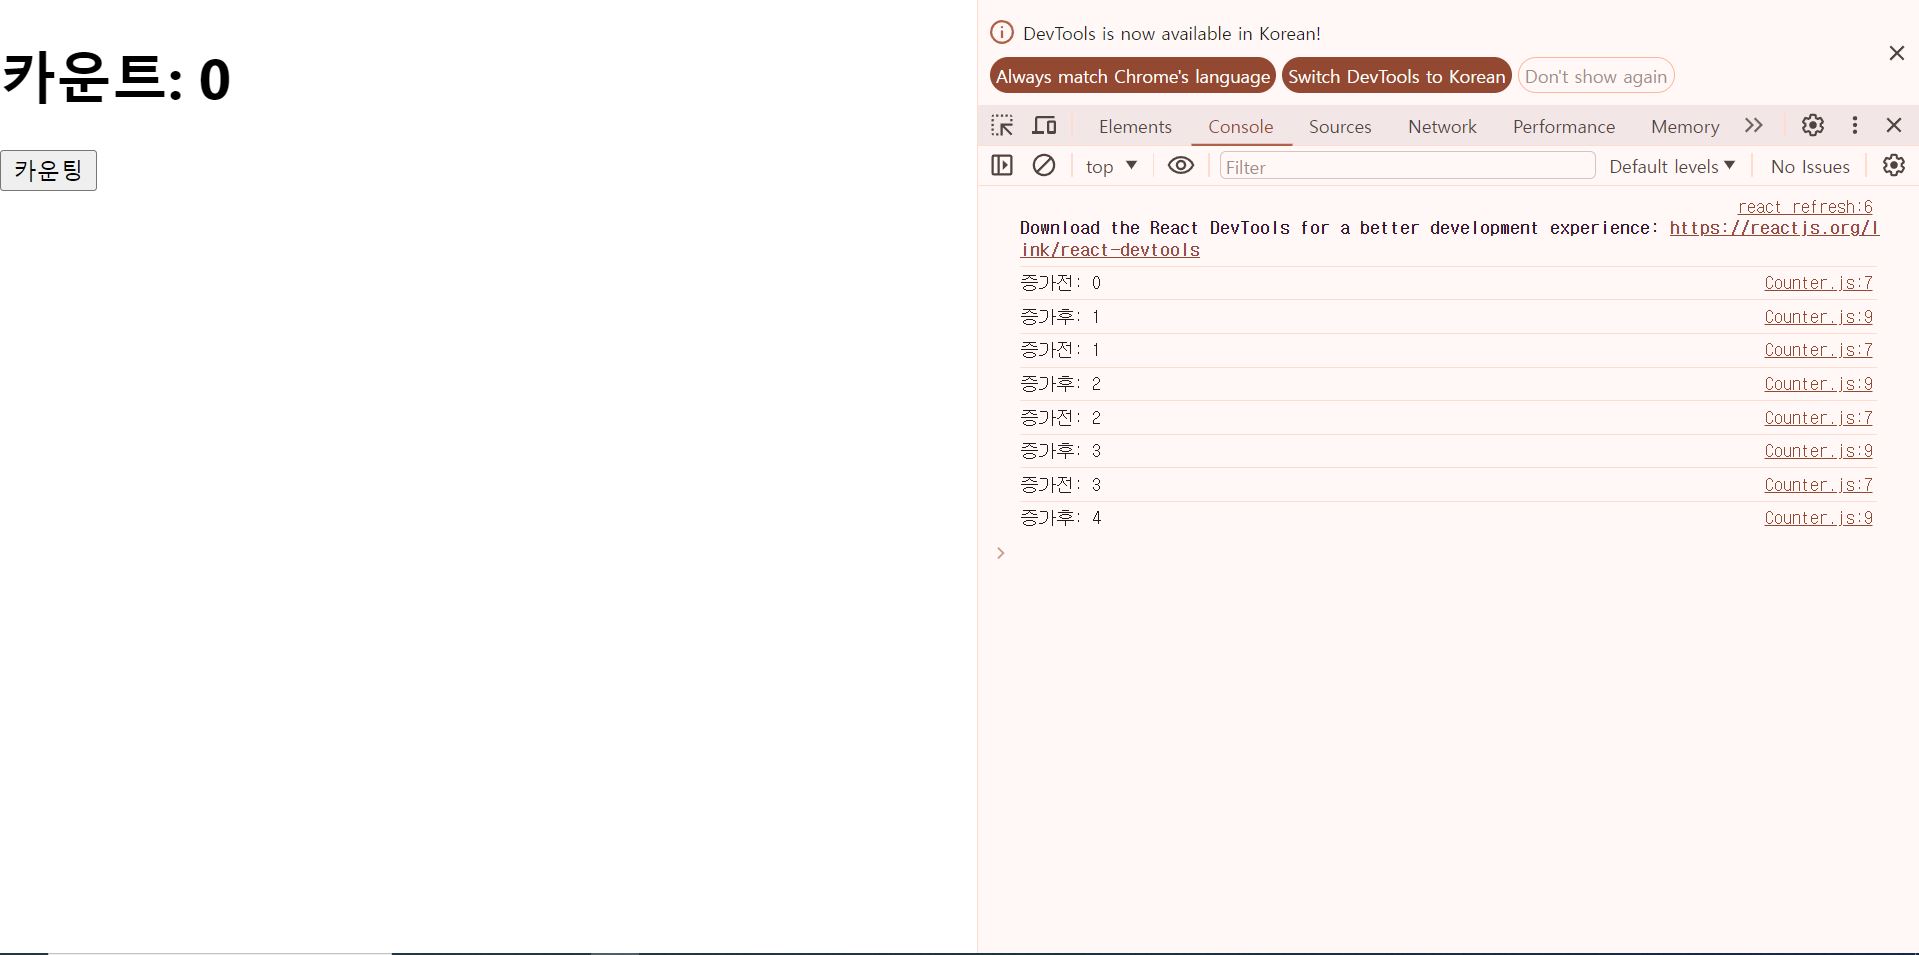
import React, { useRef } from 'react';

const Counter = () => {
    const count = useRef(0)

    const increase = () => {
        console.log(`증가전: ${count.current}`)
        count.current++
        console.log(`증가후: ${count.current}`)
    }

    return (
        <div>
        <h1>카운트: {count.current}</h1>
        <button onClick={increase}>카운팅</button>
        </div>
    );

}

export default Counter;
Counter.js 파일을 위와 같이 함수형으로 다시 작성하자! count 상태를 이용하여 숫자를 카운팅하는 예제이다. useRef 를 사용하면 카운트값이 증가할때마다 화면을 다시 그리지 않으며, 카운트 값은 아래와 같이 동기적으로 증가한다.
https://jsonplaceholder.typicode.com/
JSONPlaceholder - Free Fake REST API
👋 Using React? Check out MistCSS, our new Open Source project! Learn more 🌬️
jsonplaceholder.typicode.com
만약 오픈 API 에서 특정 블로그 글의 댓글목록을 불러와야 한다고 해보자!
[
  {
    "postId": 1,
    "id": 1,
    "name": "id labore ex et quam laborum",
    "email": "Eliseo@gardner.biz",
    "body": "laudantium enim quasi est quidem magnam voluptate ipsam eos\ntempora quo necessitatibus\ndolor quam autem quasi\nreiciendis et nam sapiente accusantium"
  },
  {
    "postId": 1,
    "id": 2,
    "name": "quo vero reiciendis velit similique earum",
    "email": "Jayne_Kuhic@sydney.com",
    "body": "est natus enim nihil est dolore omnis voluptatem numquam\net omnis occaecati quod ullam at\nvoluptatem error expedita pariatur\nnihil sint nostrum voluptatem reiciendis et"
  },
  {
    "postId": 1,
    "id": 3,
    "name": "odio adipisci rerum aut animi",
    "email": "Nikita@garfield.biz",
    "body": "quia molestiae reprehenderit quasi aspernatur\naut expedita occaecati aliquam eveniet laudantium\nomnis quibusdam delectus saepe quia accusamus maiores nam est\ncum et ducimus et vero voluptates excepturi deleniti ratione"
  },
  {
    "postId": 1,
    "id": 4,
    "name": "alias odio sit",
    "email": "Lew@alysha.tv",
    "body": "non et atque\noccaecati deserunt quas accusantium unde odit nobis qui voluptatem\nquia voluptas consequuntur itaque dolor\net qui rerum deleniti ut occaecati"
  },
  {
    "postId": 1,
    "id": 5,
    "name": "vero eaque aliquid doloribus et culpa",
    "email": "Hayden@althea.biz",
    "body": "harum non quasi et ratione\ntempore iure ex voluptates in ratione\nharum architecto fugit inventore cupiditate\nvoluptates magni quo et"
  }
]
오픈 API 데이터의 데이터 구조는 위와 같다.
import React, { Component } from "react";
import "./App.css";
import Comment from "./Comment";

class App extends Component {
  state = {
    postId: 1,
    comments: []
  }
  getComments = () => {
    const {postId} = this.state
    fetch(`https://jsonplaceholder.typicode.com/comments?postId=${postId}`)
      .then(response => response.json())
      .then(comments => this.setState({comments}))
  }
  showNextComments = () => {
    this.setState({postId: this.state.postId + 1})
    this.getComments()
  }
  componentDidMount(){
    this.getComments()
  }
  render(){
    const {comments, postId} = this.state
    return (
      <>
        <h1>블로그 ({postId})</h1>
        <button onClick={this.showNextComments}>다음</button>
        {comments.length > 0 && comments.map(comment => <Comment key={comment.id} {...comment}/>)}
      </>
    )
  }
}

export default App;
App.js 파일을 위와 같이 작성하자!
import React from 'react';

const Comment = ({name, email, body}) => {
    return (
        <div>
            <p>{body}</p>
            <span>{name} {(email)}</span>
        </div>
    );

}

export default Comment;
Comment.js 파일을 위와 같이 작성하자!
state = {
    postId: 1,
    comments: []
  }
블로그 글에 대한 ID 와 댓글목록을 저장할 상태를 각각 정의한다.
getComments = () => {
    const {postId} = this.state
    fetch(`https://jsonplaceholder.typicode.com/comments?postId=${postId}`)
      .then(response => response.json())
      .then(comments => this.setState({comments}))
  }
해당 함수는 fetch api 를 이용하여 오픈 API 에서 특정 블로그 글에 대한 댓글목록을 조회한다. 이때 블로그 글의 ID 는 state 값을 사용하고 있다.
componentDidMount(){
    this.getComments()
  }
웹 화면의 초기 렌더링이 완료되면 오픈 API 데이터를 호출한다.
return (
      <>
        <h1>블로그 ({postId})</h1>
        <button onClick={this.showNextComments}>다음</button>
        {comments.length > 0 && comments.map(comment => <Comment key={comment.id} {...comment}/>)}
      </>
    )
postId 를 이용하여 특정 블로그의 댓글목록을 보여준다. 또한, 버튼을 클릭하면 다음 블로그 글의 댓글목록을 보여줄 수 있도록 버튼도 함께 렌더링한다.
showNextComments = () => {
    this.setState({postId: this.state.postId + 1})
    this.getComments()
  }
[다음] 버튼을 클릭하면 해당 메서드가 호출되면서 postId 값을 1만큼 증가시키고 다음 댓글목록을 불러온다. 하지만 예상한대로 동작하지 않는다. 이유는 setState 는 비동기 메서드이므로 곧바로 postId 값이 증가하지 않기 때문이다.
import React, { Component } from "react";
import "./App.css";
import Comment from "./Comment";

class App extends Component {
  postId = 1 // 멤버변수
  state = {
    comments: []
  }
  getComments = () => {
    fetch(`https://jsonplaceholder.typicode.com/comments?postId=${this.postId}`)
      .then(response => response.json())
      .then(comments => this.setState({comments}))
  }
  showNextComments = () => {
    this.postId++
    this.getComments()
  }
  componentDidMount(){
    this.getComments()
  }
  render(){
    const {comments} = this.state
    return (
      <>
        <h1>블로그 ({this.postId})</h1>
        <button onClick={this.showNextComments}>다음</button>
        {comments.length > 0 && comments.map(comment => <Comment key={comment.id} {...comment}/>)}
      </>
    )
  }
}

export default App;
App.js 파일을 위와 같이 수정하자!
postId = 1 // 멤버변수블로그 글의 ID 값은 클래스의 멤버변수로 정의한다.
showNextComments = () => {
    this.postId++
    this.getComments()
  }
[다음] 버튼 클릭시 다음 블로그 글의 ID 값은 멤버변수인 postId 값을 증가시킨다. 이렇게 하면 곧바로 postId 값이 증가하기 때문에 getComments 를 호출하면 다음 댓글목록을 곧바로 불러올 수 있다. 또한, postId 값이 증가할때는 화면을 다시 그려줄 필요가 없기 때문에 setState 메서드를 사용할 필요가 없다.
import React, { useRef, useState, useEffect } from "react";
import "./App.css";
import Comment from "./Comment";

const App = () => {
  const postId = useRef(1) // 멤버변수
  const [comments, setComments] = useState([])

  const getComments = () => {
    fetch(`https://jsonplaceholder.typicode.com/comments?postId=${postId.current}`)
      .then(response => response.json())
      .then(comments => setComments(comments))
  }
  const showNextComments = () => {
    postId.current++
    getComments()
  }
  useEffect(() => {
    getComments()
  }, [])

  return (
    <>
      <h1>블로그 ({postId.current})</h1>
      <button onClick={showNextComments}>다음</button>
      {comments.length > 0 && comments.map(comment => <Comment key={comment.id} {...comment}/>)}
    </>
  )

}

export default App;
App.js 파일을 함수형 컴포넌트로 변환하면 위와 같다.
import React, { useRef, useState, useEffect } from "react";state 변경과 라이프사이클 메서드를 이용하기 위하여 useState, useEffect 함수를 임포트한다.
const postId = useRef(1) // 멤버변수특정 블로그 글의 ID 값을 저장하기 위하여 useRef 를 사용한다.
const [comments, setComments] = useState([])댓글목록을 저장하기 위하여 comments 를 빈 배열로 초기화한다.
const getComments = () => {
    fetch(`https://jsonplaceholder.typicode.com/comments?postId=${postId.current}`)
      .then(response => response.json())
      .then(comments => setComments(comments))
  }
댓글목록을 조회할때 postId.current 를 사용한다.
const showNextComments = () => {
    postId.current++
    getComments()
  }
다음 블로그 글의 댓글목록을 조회하기 위하여 postId.current 를 1만큼 증가시킨다.
useEffect(() => {
    getComments()
  }, [])
웹 화면이 초기 렌더링될때 댓글목록을 불러온다. 빈 배열은 componentDidMount 와 동일하게 동작한다.
return (
    <>
      <h1>블로그 ({postId.current})</h1>
      <button onClick={showNextComments}>다음</button>
      {comments.length > 0 && comments.map(comment => <Comment key={comment.id} {...comment}/>)}
    </>
  )
postId.current 로 다음 블로그 ID 값을 화면에 보여준다.
결론적으로 useRef 은 곧바로 변경된 값을 사용해야 할때나 화면을 새로 그리고 싶지 않은 경우에 사용한다.
React
React is the library for web and native user interfaces. Build user interfaces out of individual pieces called components written in JavaScript. React is designed to let you seamlessly combine components written by independent people, teams, and organizati
react.dev
https://muhimasri.com/blogs/how-to-save-files-in-javascript/
How to Save and Download Files in JavaScript
Learn how to create a custom function to download one or multiple files in JavaScript
muhimasri.com
https://chanhuiseok.github.io/posts/react-7/
[React] ref란? - DOM에 직접 접근하기(useRef)
컴퓨터/IT/알고리즘 정리 블로그
chanhuiseok.github.io
https://www.dhiwise.com/post/handling-multiple-and-conditional-onclick-events-in-react
Learn how to handle React onClick events
Learn how to handle Multiple and Conditional React onClick events.
www.dhiwise.com
* 요소참조 연습과제
아래와 같이 파일 업로드시 input 요소를 이용한다. 하지만 브라우저의 기본적인 파일 업로드 디자인은 보기 좋지 않기 때문에 input 요소를 숨기고, 대신 버튼을 클릭했을때 파일 업로드 창이 뜨도록 구현한다. 요소 참조를 활용하면 된다.

import './App.css';
import { Component } from 'react';

class App extends Component {
  render(){
    return (
      <div className="App">
        <h1>File Upload</h1>
        <button type="button">Upload</button>
        <input type="file" style={{visibility:'hidden'}}></input>
      </div>
    );
  }
}

export default App;
위 코드를 기반으로 구현해보자!
'프론트엔드 > React' 카테고리의 다른 글
| 리액트 기초이론 9 - 리액트 훅(React Hook) (0) | 2021.10.22 |
|---|---|
| 리액트 기초이론 8 - 리액트 라우터 (0) | 2021.10.22 |
| 리액트 기초이론 5 - 컴포넌트 스타일링 (0) | 2021.10.22 |
| 리액트 기초이론 4 - 컴포넌트의 생명주기 (Life cycle) (0) | 2021.10.22 |
| 리액트 기초이론 3 - JSX 문법 (0) | 2021.10.22 |