
* 부분 배열 만들기 - slice
[배열].slice(부분배열을 추출할 인덱스 시작점, 부분배열을 추출할 인덱스 끝점)배열의 slice 메서드는 원본배열로부터 부분배열을 추출한 다음 새로운 배열로 반환한다. 원본배열은 변경되지 않는다. 부분배열은 원본배열의 얕은 복사본이다. slice 메서드의 첫번째 인자로는 추출을 시작할 인덱스의 위치가 들어가고, 두번째 인자로는 추출을 종료할 인덱스의 위치가 들어간다.
const words = ['car', 'paper', 'mobile', 'computer', 'school', 'sun', 'house']

const slicedWords = words.slice(3)

console.log(slicedWords)
위 코드는 3번 인덱스부터 시작해서 배열요소들을 추출한 다음 새로운 배열로 반환한다.
const words = ['car', 'paper', 'mobile', 'computer', 'school', 'sun', 'house']

const slicedWords = words.slice(2, 4)

console.log(slicedWords)
위 코드는 2번 인덱스부터 시작해서 4번 인덱스 앞까지 부분배열을 추출한다. 즉, 3번 인덱스까지 추출한다.
const words = ['car', 'paper', 'mobile', 'computer', 'school', 'sun', 'house']

const slicedWords = words.slice(-4, -1)

console.log(slicedWords)
위 코드는 3번 인덱스부터 시작해서 마지막 인덱스 앞까지 부분배열을 추출한다. 즉, 5번 인덱스까지 추출한다. 인덱스가 음수인 것은 마지막 인덱스부터 시작해서 거꾸로 인덱스가 증가한다.
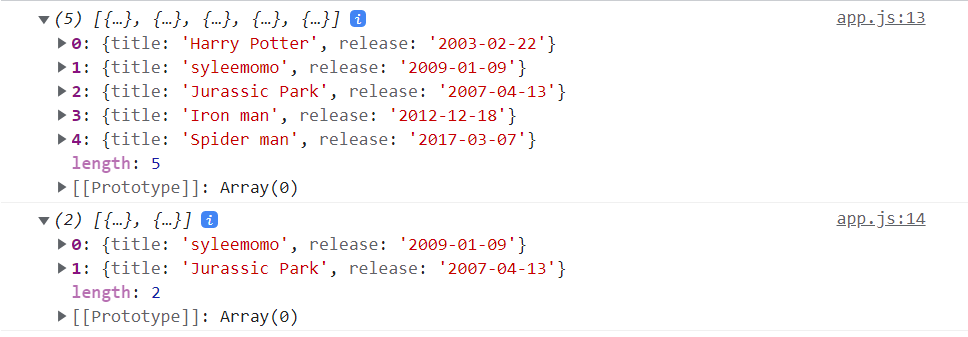
const movies = [
    {title: 'Harry Potter', release: '2003-02-22'},
    {title: 'Indiana Jhones', release: '2009-01-09'},
    {title: 'Jurassic Park', release: '2007-04-13'},
    {title: 'Iron man', release: '2012-12-18'},
    {title: 'Spider man', release: '2017-03-07'}
]

const slicedWords = movies.slice(1, 3) // 부분배열 추출

movies[1].title = 'syleemomo' // 원본배열에서 배열요소(객체)의 프로퍼티 변경

console.log(movies)
console.log(slicedWords)
배열의 slice 메서드는 얕은 복사본이기 때문에 객체들을 요소로 가지는 배열을 slice 메서드로 추출하면 객체의 주소값만 복사된다. 그러므로 원본배열에서 객체의 프로퍼티를 변경하면 slice 메서드로 추출한 부분배열에서도 동일하게 변경된다.
let myHonda = { color: "red", wheels: 4, engine: { cylinders: 4, size: 2.2 } }
let myCar = [myHonda, 2, "cherry condition", "purchased 1997"]
let newCar = myCar.slice(0, 2)

console.log("myCar = " + JSON.stringify(myCar))
console.log("newCar = " + JSON.stringify(newCar))
console.log("myCar[0].color = " + myCar[0].color)
console.log("newCar[0].color = " + newCar[0].color)

myHonda.color = "purple"
console.log("The new color of my Honda is " + myHonda.color)

// Display the color of myHonda referenced from both arrays.
console.log("myCar[0].color = " + myCar[0].color)
console.log("newCar[0].color = " + newCar[0].color)
slice 메서드는 배열의 얕은 복사본을 생성하기 때문에 원본이 변경되면 복사본도 원본의 변경사항을 반영한다. 현재 myCar 와 newCar 배열은 myHonda 라는 객체의 주소값을 참조하고 있다. myHonda의 color 속성을 변경하면 myHonda 주소값을 참조하고 있는 myCar 와 newCar 의 color 속성에도 동일하게 변경사항이 적용된다.
let str = "stringify";
console.log( str.slice(0, 5) ) // 'strin', 0번째부터 5번째 위치까지(5번째 위치의 글자는 포함하지 않음)
console.log( str.slice(0, 1) ) // 's', 0번째부터 1번째 위치까지(1번째 위치의 자는 포함하지 않음)
문자열에서 부분 문자열을 추출하기 위하여 slice 메서드를 이용할 수 있다. 해당 메서드에 시작 인덱스와 끝 인덱스를 설정하면 된다.
let str = "stringify";
console.log( str.slice(2) ) // ringify, 2번째부터 끝까지
시작 인덱스만 명시하고 끝 인덱스를 명시하지 않으면 문자열이 끝나는 지점까지 추출한다.
* 배열에서 배열요소 꺼내기 - 구조분해(destructuring assignment)
const fruits = ['apple', 'banana', 'orange', 'lemon', 'watermelon']
const [firstFruit] = fruits
console.log(firstFruit)
할당연산자의 좌변에 대괄호([])를 사용하고 변수를 지정하면 해당 변수에 배열요소가 복사된다. 위와 같이 변수를 하나만 할당하면 배열의 첫번째 요소만 복사된다.
const fruits = ['apple', 'banana', 'orange', 'lemon', 'watermelon']
const [,,thirdFruit] = fruits
console.log(thirdFruit)
콤마(,)는 fruits 배열에서 콤마가 위치한 배열요소는 건너뛴다는 의미이다. 콤마가 위치한 배열요소는 건너뛰고, 세번째 배열요소만 fruits 배열로부터 복사된다.
const fruits = ['apple', 'banana', 'orange', 'lemon', 'watermelon']
const [lastFruit] = fruits.reverse()
console.log(lastFruit)
배열의 마지막 요소만 추출하고 싶다면 reverse 메서드로 배열원소의 순서를 뒤바꾼 다음 구조분해를 이용하여 첫번째 배열요소만 복사하면 된다.
const fruits = ['apple', 'banana', 'orange', 'lemon', 'watermelon']
const [firstFruit, ...rest] = fruits
console.log(rest)
스프레드 연산자(...)를 사용하면 첫번째 배열요소를 제외한 나머지 요소들로 이루어진 부분배열을 추출할 수 있다.
const fruits = ['apple', 'banana', 'orange', 'lemon', 'watermelon']
const [firstFruit, secondFruit, ...rest] = fruits
console.log(rest)
위 코드는 첫번째와 두번째 배열요소를 제외한 나머지 요소들로 이루어진 부분배열을 rest 배열에 담는다.
const x = [1, 2, 3, 4, 5]
const [y, z] = x
console.log(y) // 1
console.log(z)  // 2
해당 코드는 x 배열에서 첫번째와 두번째 배열요소를 각각 y, z 변수에 저장한다.
let a, b

[a = 5, b = 7] = [1]
console.log(a) // 1
console.log(b) // 7
변수에 기본값을 할당하면 분해한 값이 undefined 일때 기본값을 사용한다.
let a = 1;
let b = 3;

[a, b] = [b, a]
console.log(a) // 3
console.log(b) // 1
비구조화 할당을 사용하면 손쉽게 두 값을 교체할 수 있다. 주의할 점은 반드시 b를 초기화하고, 세미콜론을 찍어야 한다.
let a = 1
let b = 3
let temp

temp = a
a = b
b = temp
console.log(a) // 3
console.log(b) // 1
만약 비구조화 할당없이 두 값을 교체하려면 위와 같이 temp 변수를 사용해야 한다.
function f() {
  return [1, 2]
}

let a, b
[a, b] = f()
console.log(a) // 1
console.log(b) // 2
함수는 배열을 반환할 수 있다. 비구조화 할당을 사용하면 함수에서 반환된 배열값을 변수에 복사해서 사용할 수 있다.
function f() {
  return [1, 2, 3]
}

const [a, , b] = f()
console.log(a) // 1
console.log(b) // 3
비구조화 할당을 사용할때 필요없는 값은 콤마로 건너띌 수 있다.
* 배열 합치기 - concat, 스프레드 연산자
[새로운 배열] = [배열 1].concat(배열 2)배열의 concat 메서드는 배열 1과 배열 2의 배열요소들을 하나로 합쳐서 새로운 배열을 반환한다. 기존 배열들은 변경되지 않는다.
const words = ['car', 'mobile', 'sun', 'foot', 'pen']
const numbers = [1, 2, 3]

const unitedArr = words.concat(numbers)

console.log(unitedArr)
위 코드는 배열의 concat 메서드를 사용하여 words 와 numbers 배열의 요소들을 하나로 합쳐서 unitedArr 라는 새로운 배열을 반환한다.
const words = ['car', 'mobile', 'sun', 'foot', 'pen']
const numbers = [1, 2, 3]

const unitedArr = [...words, ...numbers]

console.log(unitedArr)
위 코드는 concat 메서드를 사용하는 대신 스프레드 연산자(...)를 이용하여 새로운 배열에 각 배열의 요소들을 풀어헤쳐서 복사한다. 이렇게 하면 concat 을 사용한 코드와 동일한 동작을 한다.
* 배열요소를 합쳐서 하나의 결과값 반환하기 - reduce
const numbers = [1, 2, 3, 4, 5, 6, 7, 8, 9, 10]
const sum = numbers.reduce((accumulator, number) => accumulator + number, 0)

console.log(sum)
reduce 메서드는 배열 각각의 요소를 순회하면서 리듀서(reducer) 함수를 실행하고, 하나의 결과값을 반환한다. 현재 리듀서 함수는 accumulator 에 배열요소를 순차적으로 더하면서 다시 결과값을 accumulator 에 저장한다.
const numbers = [1, 2, 3, 4, 5, 6, 7, 8, 9, 10]

let accumulator = 0
for(let number of numbers){
  accumulator = accumulator + number
}

console.log(accumulator)
reduce 메서드를 사용하지 않고, for 반복문을 사용한 코드로 변경하면 위와 같다. 동작은 동일하다.
const coords = [{ x: 1, y: 2 }, { x: 5, y: 5 }, { x: 3, y: 4 }]
const vectorSum = coords.reduce((accumulator, coord) => accumulator = { x: accumulator.x + coord.x, y: accumulator.y + coord.y }, {x: 0, y: 0})

console.log(vectorSum)
객체들을 요소로 가지는 배열에도 reduce 메서드를 사용할 수 있다. 해당 코드는 2차원 평면에서 벡터의 합을 계산한다.
const coords = [{ x: 1, y: 2 }, { x: 5, y: 5 }, { x: 3, y: 4 }]

let accumulator = {x: 0, y: 0}
for(let coord of coords){
  accumulator = {x: accumulator.x + coord.x, y: accumulator.y + coord.y}
}
console.log(accumulator)
reduce 메서드를 사용하지 않고, for 반복문을 사용한 코드로 변경하면 위와 같다. 동작은 동일하다.
const nestedArr = [
  [0, 1],
  [2, 3],
  [4, 5],
]

const flattenedArr = nestedArr.reduce(function (accumulator, arrayInside) {
  return accumulator.concat(arrayInside)
}, [])
console.log(flattenedArr)
reduce 메서드를 사용하여 2차원 배열을 1차원 배열로 변경할 수 있다.
var names = ["Alice", "Bob", "Tiff", "Bruce", "Alice"]

var countedNames = names.reduce(function (allNames, name) {
  if (name in allNames) {
    allNames[name]++
  } else {
    allNames[name] = 1
  }
  return allNames
}, {})

console.log(countedNames)
reduce 메서드를 사용하면 배열에서 중복되는 배열요소가 몇개인지 빈도수를 검사할 수 있다. 조건문에서 name in allNames 는 allNames 객체에 name 이라는 속성이 존재하는지 검사한다.
const people = [
  { name: "Alice", age: 21 },
  { name: "Max", age: 20 },
  { name: "Jane", age: 20 },
];

function groupBy(objectArray, property) {
  return objectArray.reduce(function (acc, obj) {
    var key = obj[property]
    if (!acc[key]) {
      acc[key] = []
    }
    acc[key].push(obj)
    return acc
  }, {})
}

const groupedPeople = groupBy(people, "age")
console.log(groupedPeople)

// groupedPeople is:
// {
//   20: [
//     { name: 'Max', age: 20 },
//     { name: 'Jane', age: 20 }
//   ],
//   21: [{ name: 'Alice', age: 21 }]
// }
해당 코드는 객체들의 배열에서 객체의 속성값에 따라 객체들을 분류하는데 reduce 메서드를 사용하고 있다.
const friends = [
  {
    name: "Anna",
    books: ["Bible", "Harry Potter"],
    age: 21,
  },
  {
    name: "Bob",
    books: ["War and peace", "Romeo and Juliet"],
    age: 26,
  },
  {
    name: "Alice",
    books: ["The Lord of the Rings", "The Shining"],
    age: 18,
  },
];

const allbooks = friends.reduce(
  function (accumulator, currentValue) {
    return [...accumulator, ...currentValue.books];
  },
  ["Alphabet"],
)
console.log(allbooks)

// allbooks = [
//   'Alphabet', 'Bible', 'Harry Potter', 'War and peace',
//   'Romeo and Juliet', 'The Lord of the Rings',
//   'The Shining'
// ]
해당 코드는 초기배열과 스프레드 연산자(...), 그리고 reduce 메서드를 이용하여 친구들이 각자 가지고 있는 도서목록인 books 프로퍼티(배열)의 값들만 모아서 새로운 배열을 반환해준다. 즉, 전체 친구들이 가지고 있는 도서목록을 새로운 배열로 반환한다.
const arr = [1, 2, 1, 2, 3, 5, 4, 5, 3, 4, 4, 4, 4]
const result = arr.sort().reduce((accumulator, current) => {
  const length = accumulator.length
  if (length === 0 || accumulator[length - 1] !== current) {
    accumulator.push(current)
  }
  return accumulator
}, [])
console.log(result)
해당 코드는 reduce 메서드를 이용하여 배열에서 중복을 제거한다.
* 배열을 문자열로 변경하기 - join
[배열].join(구분문자)배열의 join 메서드는 인자로 주어진 구분문자로 배열요소들을 하나로 합쳐서 하나의 문자열로 변경한다. 배열의 길이가 0이면 빈 문자열을 반환한다.
const fruits = ['apple', 'banana', 'orange']

const fruitsStr = fruits.join(' ')

console.log(fruitsStr)
위 코드는 fruits 배열의 요소들을 공백문자로 구분하여 하나의 문자열로 변경한다.
const fruits = ['apple', 'banana', 'orange']

const fruitsStr = fruits.join(' & ')

console.log(fruitsStr)
위 코드는 fruits 배열의 요소들을 & (엠퍼센드) 로 구분하여 하나의 문자열로 변경한다.
* 문자열을 배열로 변경하기 - split
[배열] = 문자열.split(구분문자)
문자열의 split 메서드는 인자로 주어진 구분문자로 하나의 문자열을 여러개의 문자열로 쪼개준다. 빈 문자열인 경우 빈 문자열을 하나의 요소로 가진 배열을 반환한다. 구분문자는 문자열이나 정규표현식을 사용할 수 있다.
const str = ''
const strSeprated = str.split()
console.log(strSeprated)
위 코드는 빈 문자열이므로 빈 문자열을 하나의 요소로 가진 배열을 반환한다.

const sentence = 'I joined swimming club in my highschool'
const splitedSentence = sentence.split()
console.log(splitedSentence)
위 코드는 구분문자를 설정하지 않았기 때문에 sentence 문장 전체를 요소로 가진 배열을 반환한다.

const sentence = 'I joined swimming club in my highschool'
const splitedSentence = sentence.split('')
console.log(splitedSentence)
위 코드는 구분문자를 빈 문자열로 주었다. 이렇게 하면 sentence 문장을 문자 하나씩 잘라서 배열로 반환한다.

const sentence = 'I joined swimming club in my highschool'
const splitedSentence = sentence.split(' ')
console.log(splitedSentence)
위 코드는 구분문자로 공백문자를 설정하였다. 이렇게 하면 sentence 문장을 공백으로 구분하여 배열로 반환한다.

const sentence = 'I (joined) swimming <club> in my highschool'
const splitedSentence = sentence.split(/[()<>]/)
console.log(splitedSentence)
구분문자에는 정규표현식을 설정할 수 있다. 정규표현식은 아직 배우지는 않았지만 대괄호 안에 구분문자를 여러개 설정하면 해당 구분문자들 중 어느 하나이면 문자열을 잘라준다. 여기에서는 열린 괄호, 닫힌 괄호, 열린 꺽새, 닫힌 꺽새 중 어느 하나이면 sentence 문자열을 잘라준다.

const sentence = 'I joined swimming club in my highschool'
const splitedSentence = sentence.split(' ', 3)
console.log(splitedSentence)
문자열의 split 메서드는 두번째 인자를 설정할 수 있다. 이렇게 하면 구분문자로 끊어진 배열의 길이를 설정할 수 있다. 결과는 아래와 같다.

const sentence = 'I^,^joined^,^swimming^,^club^,^in^,^my^,^highschool'
const splitedSentence = sentence.split(['^', '^'])
console.log(splitedSentence)
문자열의 split 메서드에는 구분문자로 배열을 사용할 수 있다. 이렇게 하면 배열요소들이 콤마로 구분된 하나의 문자열로 변경된다. 즉, 위 코드에서 구분문자는 결국 ^,^ 이 된다. 그래서 결과는 아래와 같다.

const sentence = 'I joined swimming club in my highschool. that club was awsome !'
const foundedKeyword = sentence.split(' ').filter(word => word === 'club')
console.log(foundedKeyword.length)
위 코드는 split, filter 메서드를 함께 사용하여 sentence 문자열에서 club 이라는 부분 문자열이 몇번 들어가 있는지 검사한다. 물론, 배열의 indexOf 나 includes 메서드를 사용해도 같은 기능을 구현할 수 있다.
* 배열과 문자열 메서드를 함께 사용하기 - split, join
const sentence = '?죠밌재 트립크스바자'
const splitedSentence = sentence.split('').reverse().join('')
console.log(splitedSentence)
문자열의 split 메서드는 join 메서드와 함께 사용할 수 있다. 왜냐하면 split 메서드의 반환값이 배열이기 때문이다. 위 코드는 sentence 문자열을 문자 하나씩 잘라낸 배열로 만든 다음 reverse 메서드로 뒤짚고 join 메서드로 다시 하나로 합친다.
const sentence = 'I joined swimming club in my highschool. that club was awsome !'
const modifiedSentence = sentence.
                        split(' ')
                        .map(word => {
                            return word = word === 'club' ? `${word} 🏊` : word
                        })
                        .join(' ')
console.log(modifiedSentence)
위 코드는 함수 체이닝을 사용하여 split, map, join 메서드를 연쇄적으로 실행한다. sentence 문자열에서 club 이 들어가는 단어 옆에 수영을 의미하는 아이콘을 추가하는 코드이다. map 메서드는 반드시 return 이 필요하다.

* 배열의 깊은복사(deep copy) 얕은복사(shallow copy)
* 연습과제 1
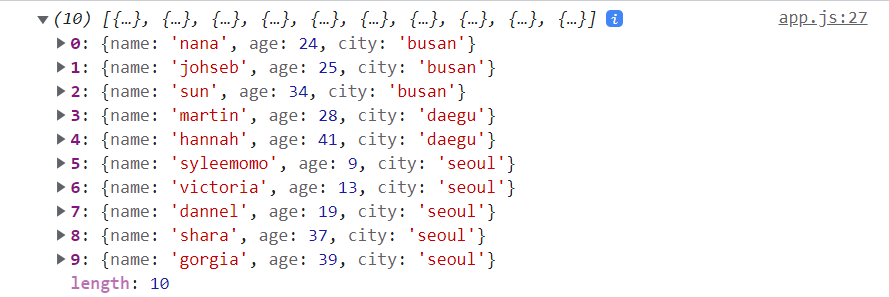
다음은 SNS 에 등록된 나의 친구목록이다.
const friends = [
    {name: 'victoria', age: 13, city: 'seoul'},
    {name: 'sun', age: 34, city: 'busan'},
    {name: 'johseb', age: 25, city: 'busan'},
    {name: 'syleemomo', age: 9, city: 'seoul'},
    {name: 'hannah', age: 41, city: 'daegu'},
    {name: 'shara', age: 37, city: 'seoul'},
    {name: 'martin', age: 28, city: 'daegu'},
    {name: 'gorgia', age: 39, city: 'seoul'},
    {name: 'nana', age: 24, city: 'busan'},
    {name: 'dannel', age: 19, city: 'seoul'},
]

// 구현하기
사용자는 현재 서울에 살고 있기 때문에 서울에 살고 있는 사용자만 화면에 보여주고 싶다. 그래서 위 friends 배열을 도시 기준으로 정렬한 다음, 서울에 살고 있는 친구들만 slice 메서드로 추출해보자! 단, 도시 기준으로 정렬한 다음 같은 도시라면 다시 나이순으로 정렬해서 보여줘야 한다.

* 연습과제 2
아래는 에픽하이의 노땡큐 가사이다. 문제는 아래 곡을 웹사이트에 보여주고 싶지만 아이들이 보는 사이트라서 욕이 들어간 부분은 귀여운 아이콘으로 변경해서 보여주고 싶다. 똥이나 shit 은 💩 로, fuck 은 ❤️ 로 교체해서 보여주자!
const rootDiv = document.getElementById('root')

const lyrics = `
Don't, don't worry 'bout \n
Don't worry \n
Don't worry \n
Don't, don't worry 'bout me \n
오지랖 떨지 말고 신경 꺼 \n
온 세상이 날 등져도 I don't give a fuck \n
God is watchin' over me 나 죽을 일 없어 \n
내 걱정은 세상에서 제일 쓸데없는 짓 \n
부정적인 shit, man I ain't got time \n
썸머소닉 to 코첼라, 글라스톤베리가 다음 \n
일상이 축제니까 감사하기도 바빠 \n
Middle finger to the Devil, stop fuckin' up my vibe! \n
영화처럼 살았네 \n
역경이 상대역인데 웃으며 환영해 \n
그 정도는 돼야 내가 인생 연기를 해주잖냐 \n
보여줘야지, 사방이 아역들인데 \n
애들이 배우잖아 \n
내 혼을 베어다가 아낌없이 준 내 아티스트리 \n
다 남을 깎아내릴 때 난 나를 깎아 나눴지 \n
'Cause I am Groot motherfucker \n
Ay mind yo fuckin' business 너는 내 걱정 안 해도 돼 \n
부러우면 그냥 부럽다고 말해도 돼 \n
네가 신경 안 써줘도 나는 잘 지내거든 \n
Don't you worry 'bout me \n
You know I'm fly muthafucka \n
Baby never give a fuck about a thang \n
그게 나에 관한 거라면 더욱더 no thanks \n
Baby never give a fuck about a thang \n
내 걱정은 no thanks \n
신경써줘서 고마워 \n
아가미 달린 시키 알아서 헤엄 치니 \n
Take care of yourself \n
치킨 다리 먼저 겟할 걱정이나 해 \n
모지리 이미지야 이리 잘하니 zip your lips huh? \n
대장인 척 해도 소화 못해 거기서 쳇기 쳇기 \n
쉬운 게 아니야, 무대는 'bout your 객기 \n
체크해 motherfuckers, my lyrics \n
Motherfucker 만 써도 이젠 혐이라 하는 시대, shit \n
Rhyme에 R도 모르는 대중은 프로듀서가 됐고 \n
농사짓는 울 삼촌은 거의 엔터 제작 대표 \n
조카는 음평가 태도 \n
내가 니 안줏거리지만 내가 느그 상사 느그 선생 아니듯이 \n
느그들이 누굴 평가하고 하면 띠꺼워 \n
내 사생활이 궁금하면 니가 내 엄마해 새꺄 알겠어? \n
Ay mind yo fuckin' business 너는 내 걱정 안 해도 돼 \n
부러우면 그냥 부럽다고 말해도 돼 \n
네가 신경 안 써줘도 나는 잘 지내거든 \n
Don't you worry 'bout me \n
You know I'm fly muthafucka \n
Baby never give a fuck about a thang \n
그게 나에 관한 거라면 더욱더 no thanks \n
Baby never give a fuck about a thang \n
내 걱정은 no thanks, ya \n
경쟁은 관심 밖, 돌린 눈과 귀 \n
틈만 나면 찾고 있네, 다음 휴가지 \n
나이 들어 보니까 인생은 주관식 \n
남 보기보다 중요해, 내 삶이 둔 가치 \n
고이 무렵부터 내 갈 길을 걸어 \n
나도 안 한 내 걱정을 해준 분들 여럿 \n
덕분에 내 할 일에만 매진한 결과 \n
난 이제 돈과 시간 모두 몇 배를 더 벌어 \n
너 할 일 해, 시간이 돈인데 \n
다 먹고 살만한가 봐? 두 손 놀리네 \n
날 한 방 먹일 생각이면 좀 더 고민해 \n
대식가인 내겐 먹어봐야 겨우 요기인데 \n
난 물먹어도 절망 안에 배영 \n
잠수타도 14년째 곡이 배를 채워 \n
불통보다 소통이 더 유행이니까 \n
다 들어 줄게, 불만 있는 놈들 먼저 줄부터 세워 (걱정하지 말아요) \n
야야 난 first class 양아치에 third class 연예인 \n
내 Hollywood style 연애는 엄마의 스트레스 원인 \n
삶은 계속되는 이별여행, 쉴틈없이 나는 꺼내 \n
이번 애인은 의사였으면 해, 정신병원에 \n
틈만 나면 한 눈 팔아, 나는 오급 장애죠 \n
나의 불행은 너의 행복, 그래 맘껏 즐겨줘 \n
망막 기증까진 오바야, 날 그만 걱정해줘 \n
나는 저 멀리 보고 살아, 한쪽으로도 \n
힙합씬은 여전히 내겐 오백의 삼십 사이즈 \n
내 영혼이 살기엔 너무 좆만해서 탄식 하 \n
나는 오로지 나의 존망만이 관심사 \n
욕을 존나 쳐먹어도 찌지 않아, 망신살 \n
"출근 안하는 CEO", "허슬 안하는 랩퍼" \n
"내 거품 속에서 목욕하는 그녀들은 왜 예뻐?" \n
성실한 이름들 사이에 이제 나는 못 껴 \n
난 시간에 쫒겨 살해당한 내 시체를 자주 목격 \n
앨범은 내 때가 되면 내, 비난은 발매가 되면 해 \n
기다려주는 팬들에게 미안해 기분 개같았는데 \n
돈도 좆도 안되는 대체 왜 너네가 negative? \n
니 오빠 똥꼬나 더 긁어줘라 fuck your magnetic \n
백날 씨부려대봤자 내 입만 아픔 \n
에픽 앨범에 난 똥을 싸질러놨구 \n
이건 내가 예전에 깠던 Born Hater Part 2 \n
일동 기립 박수 안 칠거면 내 얼굴에 칵 투 \n
Ay mind yo fuckin' business 너는 내 걱정 안 해도 돼 \n
부러우면 그냥 부럽다고 말해도 돼 \n
네가 신경 안 써줘도 나는 잘 지내거든 \n
Don't you worry 'bout me \n
You know I'm fly muthafucka \n
Baby never give a fuck about a thang \n
그게 나에 관한 거라면 더욱더 no thanks \n
Baby never give a fuck about a thang \n
내 걱정은 no thanks \n
You get one life \n
나한테 낭비하지 마라 \n
Can I live my life? \n
Let me live it how I wanna \n
내 걱정은 no thanks (내 걱정은 no thanks) \n
내 걱정은 no thanks (내 걱정은 no thanks) \n
내 걱정은 no thanks (thank you) \n
I am
`

// 구현하기


console.log(modifiedSentence)
rootDiv.innerHTML = modifiedSentence
<!DOCTYPE html>
<html lang="en">
<head>
<meta charset="UTF-8">
<meta http-equiv="X-UA-Compatible" content="IE=edge">
<meta name="viewport" content="width=device-width, initial-scale=1.0">
<title>자바스크립트 연습</title>
<link rel='stylesheet' href='style.css'/>
</head>
<body>
<div id='root'></div>
<script src="app.js"></script>
</body>
</html>body{
margin: 0;
padding: 0;
}
#root{
width: 60%;
margin: 100px auto;
display: flex;
flex-wrap: wrap;
justify-content: center;
align-items: center;
line-height: 27px;
}📙 Emojipedia — 😃 Home of Emoji Meanings 💁👌🎍😍
emojipedia.org
* 연습과제 3
아래는 셜록홈즈 소설 중 '보헤미아 왕국의 스캔들' 내용의 일부를 발췌한 것이다. 해당 소설의 내용을 이용하여 알파벳 사용빈도를 검사하는 웹사이트를 만들고 싶다. 즉, a 부터 z 까지 각 알파벳이 해당 소설에서 몇번 나오는지 알고 싶다. 이를 구현해보자! 단, 가장 많이 나오는 알파벳 순(빈도순)으로 정렬해서 보여줘야 한다.
const novel = `
Sherlock Holmes she is always the
woman. I have seldom heard him mention her under any other name. In his
eyes she eclipses and predominates the
whole of her sex. It was not that he felt any emotion akin to love for Irene Adler. All emotions, and
that one particularly, were abhorrent to his cold,
precise but admirably balanced mind. He was, I
take it, the most perfect reasoning and observing
machine that the world has seen, but as a lover he
would have placed himself in a false position. He
never spoke of the softer passions, save with a gibe
and a sneer. They were admirable things for the observer—excellent for drawing the veil from men’s
motives and actions. But for the trained reasoner
to admit such intrusions into his own delicate and
finely adjusted temperament was to introduce a distracting factor which might throw a doubt upon all
his mental results. Grit in a sensitive instrument, or
a crack in one of his own high-power lenses, would
not be more disturbing than a strong emotion in
a nature such as his. And yet there was but one
woman to him, and that woman was the late Irene
Adler, of dubious and questionable memory.
I had seen little of Holmes lately. My marriage
had drifted us away from each other. My own
complete happiness, and the home-centred interests which rise up around the man who first finds
himself master of his own establishment, were sufficient to absorb all my attention, while Holmes,
who loathed every form of society with his whole
Bohemian soul, remained in our lodgings in Baker
Street, buried among his old books, and alternating
from week to week between cocaine and ambition,
the drowsiness of the drug, and the fierce energy of
his own keen nature. He was still, as ever, deeply
attracted by the study of crime, and occupied his
immense faculties and extraordinary powers of observation in following out those clues, and clearing
up those mysteries which had been abandoned as
hopeless by the official police. From time to time
I heard some vague account of his doings: of his
summons to Odessa in the case of the Trepoff murder, of his clearing up of the singular tragedy of
the Atkinson brothers at Trincomalee, and finally
of the mission which he had accomplished so delicately and successfully for the reigning family of
Holland. Beyond these signs of his activity, however, which I merely shared with all the readers of
the daily press, I knew little of my former friend
and companion.
`

const classified = {}
const specialCharacters = '`~!@#$%^&*()-_=+|\<>,.?/:;\'"—’'
const alphabetFrequency = []

// 구현하기
classified 객체는 각 알파벳의 사용빈도를 저장하는 변수이며, specialCharacters 는 특수문자인 경우 사용빈도 검사에서 제외하기 위한 변수이다. alphabetFrequency 는 빈도순으로 정렬하기 위하여 데이터를 변형하기 위한 변수이다.
배열의 split 메서드를 사용하여 소설 내용을 각각의 문자들을 요소로 가지는 배열로 만든 다음 문자 하나씩 검사하면 된다. 대문자는 소문자로 변경하여 검사한다. 특수문자나 공백문자 그리고 띄워쓰기 문자(\n)는 검사에서 제외한다.
'문자'.toLowerCase()대문자를 소문자로 변경하는 코드는 위와 같다.

* 연습과제 4
아래는 에픽하이의 우산(Feat. 윤하) 노래 가사이다. 사용자가 입력창에 검색어를 입력하면 캡쳐화면과 같이 하이라이트가 적용되게 해보자! 검색어 하이라이트 기능 구현에서 대소문자 구분은 하지 않는다.
const lyricsEl = document.getElementById('lyrics')
const searchEl = document.getElementById('search')

const lyrics = `
어느새 빗물이 \n
내 발목에 고이고 \n
참았던 눈물이 \n
내 눈가에 고이고 I cry \n
텅 빈 방엔 시계소리 \n
지붕과 입 맞추는 비의 소리 \n
오랜만에 입은 코트 주머니 속에 반지 \n
손 틈새 스며드는 memory \n
며칠 만에 나서보는 밤의 서울 \n
고인 빗물은 작은 거울 \n
그 속에 난 비틀거리며 아프니까 \n
그대 없이 난 한 쪽 다리가 짧은 의자 \n
둘이서 쓰긴 작았던 우산 \n
차가운 세상에 섬 같았던 우산 \n
이젠 너무 크고 어색해 \n
그대 곁에 늘 젖어있던 왼쪽 어깨 (뭐해?) \n
기억의 무게에 고개 숙여보니 \n
버려진 듯 풀어진 내 신발끈 \n
허나 곁엔 오직 비와 바람 \n
(없다) 잠시라도 우산을 들어줄 사람 \n
And I cry \n
어느새 빗물이 \n
내 발목에 고이고 \n
참았던 눈물이 \n
내 눈가에 고이고 I cry \n
그대는 내 머리 위의 우산 \n
어깨 위에 차가운 비 내리는 밤 \n
내 곁에 그대가 습관이 돼버린 나 \n
난 그대 없이는 안 돼요. Alone in the rain \n
Alone in the rain, rain, rain \n
Nothin' but pain, pain, pain \n
Girl, I just want you to know \n
Alone in the rain, rain, rain \n
Nothin' but pain, pain, pain \n
And I just can't let you go \n
하늘의 눈물이 고인 땅 \n
별을 감춘 구름에 보인 달 \n
골목길 홀로 외로운 구두 소리 \n
메아리에 돌아보며 가슴 졸인 맘 \n
나를 꼭 닮은 그림자 \n
서로가 서로를 볼 수 없었던 우리가 \n
이제야 둘인가? 대답을 그리다 \n
머릿속 그림과 대답을 흐린다 \n
내 눈엔 너무 컸던 우산 \n
날 울린 세상을 향해 접던 우산 \n
영원의 약속에 활짝 폈던 우산 \n
이제는 찢겨진 우산 아래 두 맘 \n
돌아봐도 이젠 없겠죠 \n
두 손은 주머니 속 깊게 넣겠죠 \n
이리저리 자유롭게 걸어도 \n
두 볼은 가랑비에도 쉽게 젖겠죠 \n
난 열어놨어, 내 마음의 문을 \n
그댄 내 머리 위의 우산 \n
그대의 그림자는 나의 그늘 \n
그댄 내 머리 위의 우산 \n
나의 곁에 \n
그대가 없기에 \n
나 창 밖에 우산을 들고 \n
기다리던 그대, I cry \n
그대는 내 머리 위의 우산 \n
어깨 위에 차가운 비 내리는 밤 \n
내 곁에 그대가 습관이 돼버린 나 \n
난 그대 없이는 안 돼요. I need you back in my life \n
그대는 내 머리 위의 우산 \n
어깨 위에 차가운 비 내리는 밤 \n
내 곁에 그대가 없는 반쪽의 세상 \n
그대 나 없이는 안 돼요. Forever in the rain \n
버려진 우산 \n
버려진 우산 \n
I need you back \n
버려진 우산 \n
Without you \n
`


// 구현하기
노래가사 하이라이트 기능이 완성된 모습은 아래와 같다.
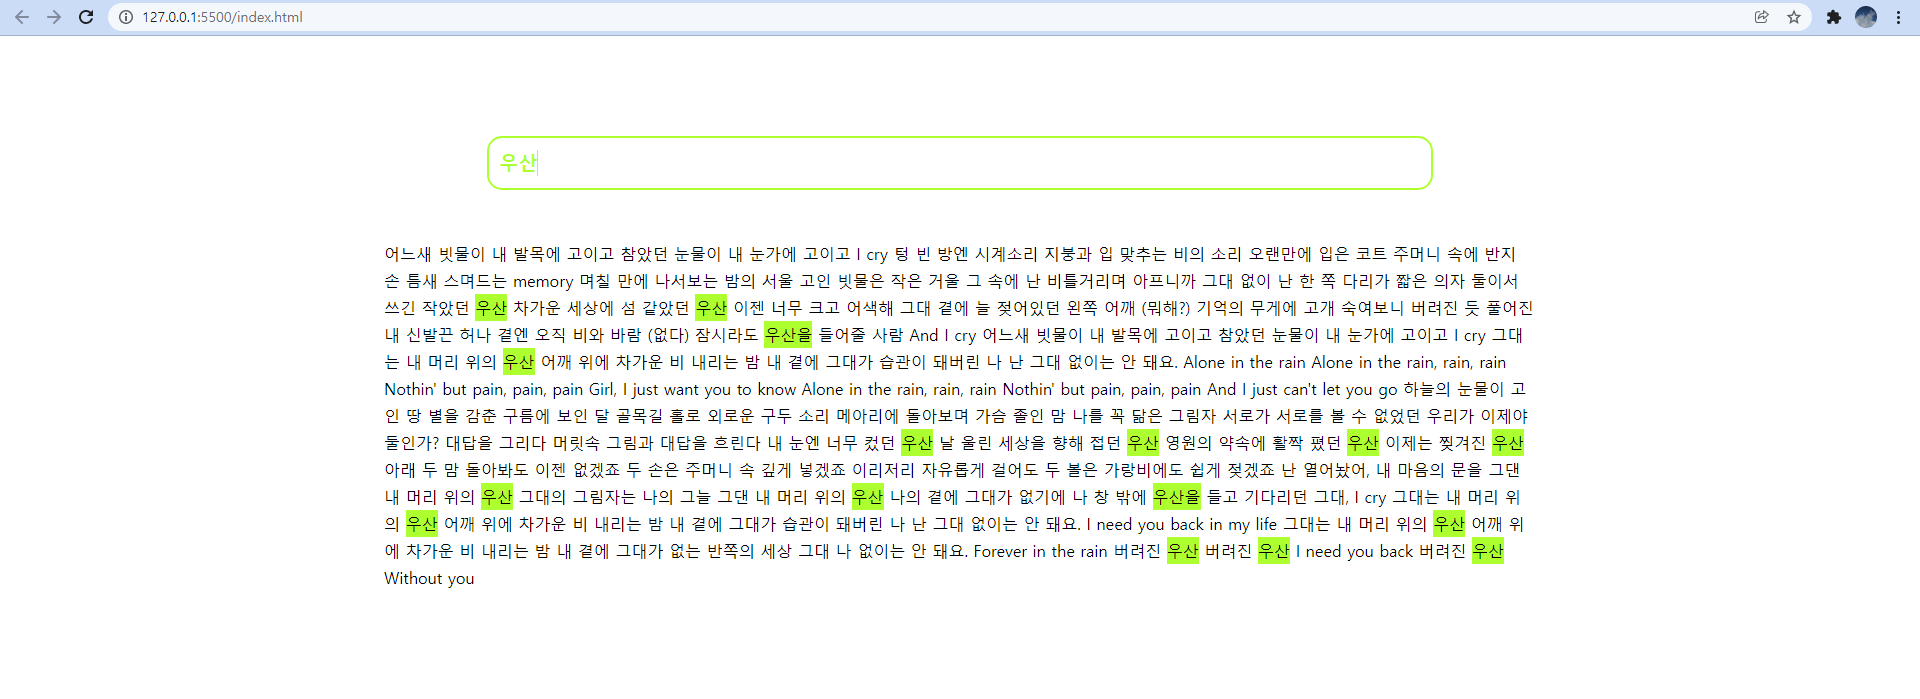
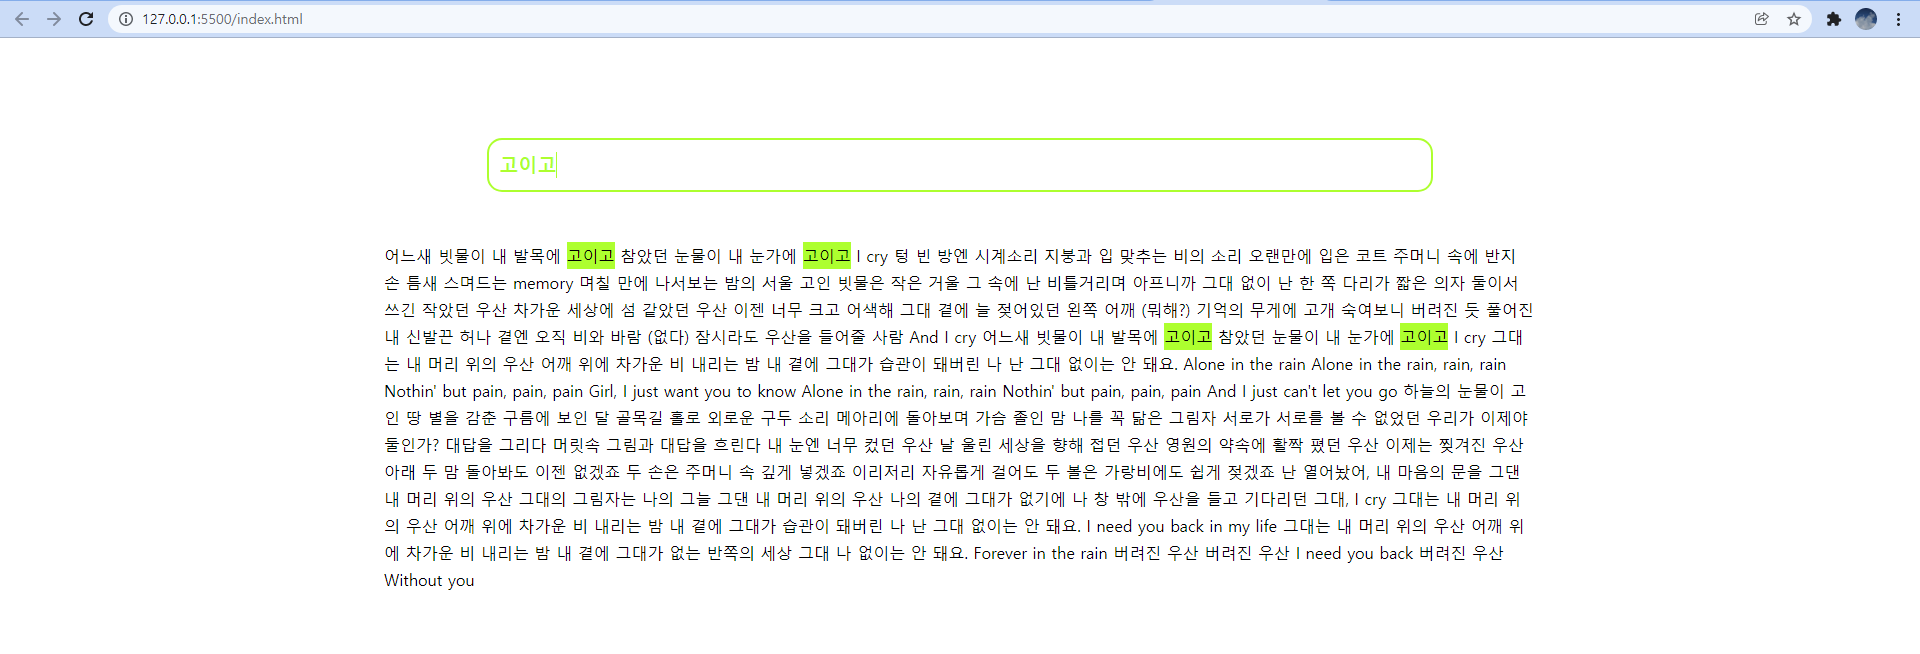
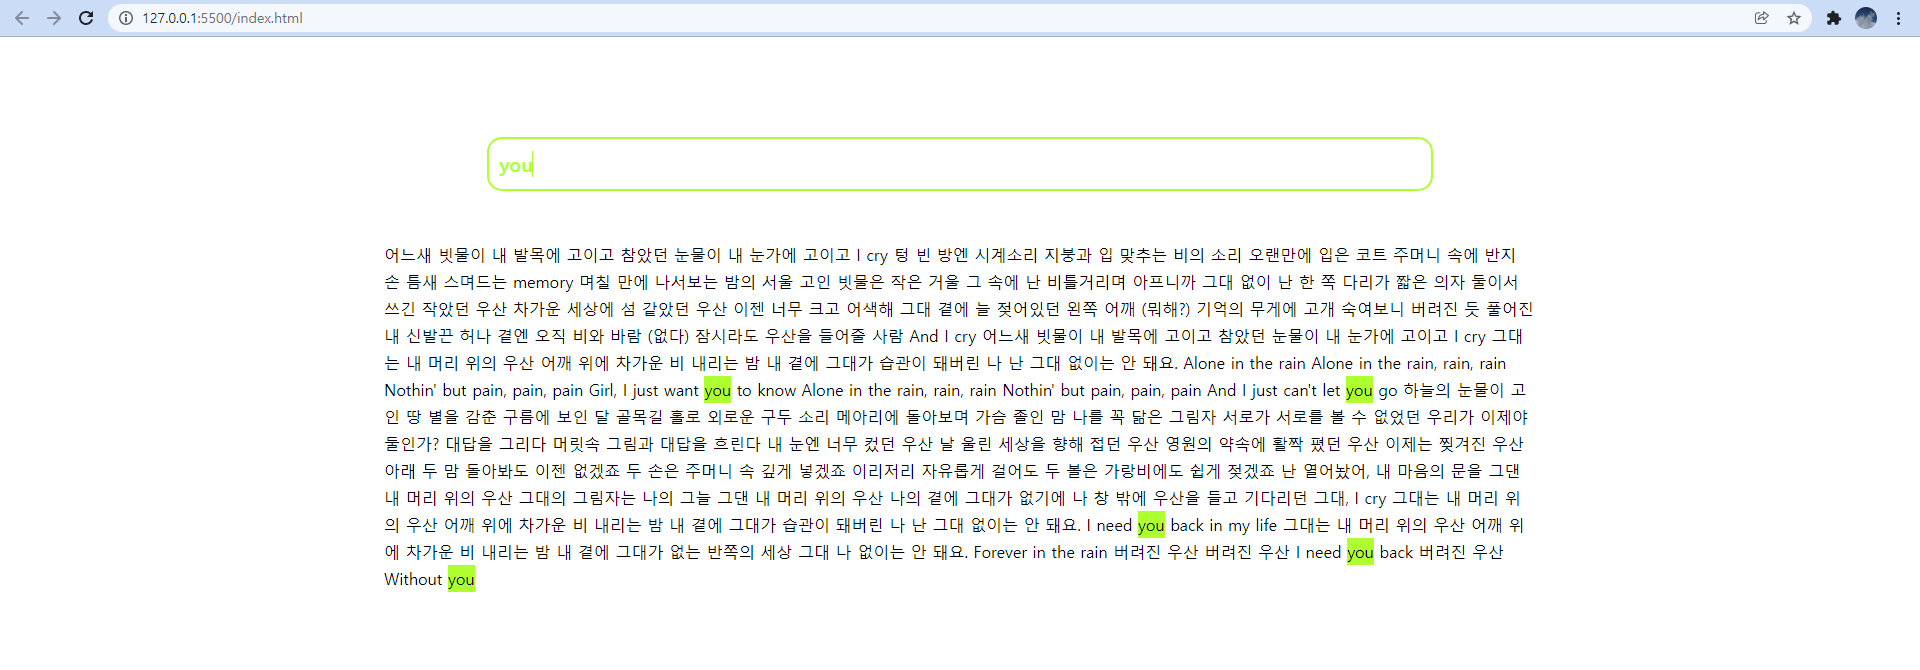
관련된 코드의 일부는 아래와 같다.
<!DOCTYPE html>
<html lang="en">
<head>
    <meta charset="UTF-8">
    <meta http-equiv="X-UA-Compatible" content="IE=edge">
    <meta name="viewport" content="width=device-width, initial-scale=1.0">
    <title>자바스크립트 연습</title>
    <link rel='stylesheet' href='style.css'/>
</head>
<body>
    <div id='root'>
        <input id='search' type='text' placeholder="Search keyword ...">
        <p id='lyrics'></p>
    </div>
    <script src="app.js"></script>
</body>
</html>
body{
margin: 0;
padding: 0;
}
#root{
width: 60%;
margin: 100px auto;
display: flex;
flex-wrap: wrap;
justify-content: center;
align-items: center;
line-height: 27px;
}
#search{
all: unset;
width: 80%;
height: 30px;
border: 2px solid greenyellow;
border-radius: 15px;
padding: 10px;
color: greenyellow;
font-weight: bold;
font-size: 1.2rem;
}
#search::placeholder{
color: greenyellow;
font-weight: bold;
font-size: 1.2rem;
}
#lyrics{
font-size: 1rem;
font-weight: 400;
margin-top: 50px;
}
.highlight{
background: greenyellow;
display: inline-block;
}
* 연습과제 5
웹사이트에 사용자 댓글 기능을 구현해보자! 아래와 같이 사용자가 댓글을 입력할때 비속어가 포함되어 있으면 웃는 얼굴의 아이콘 (😊)으로 교체해서 보여주도록 해보자!
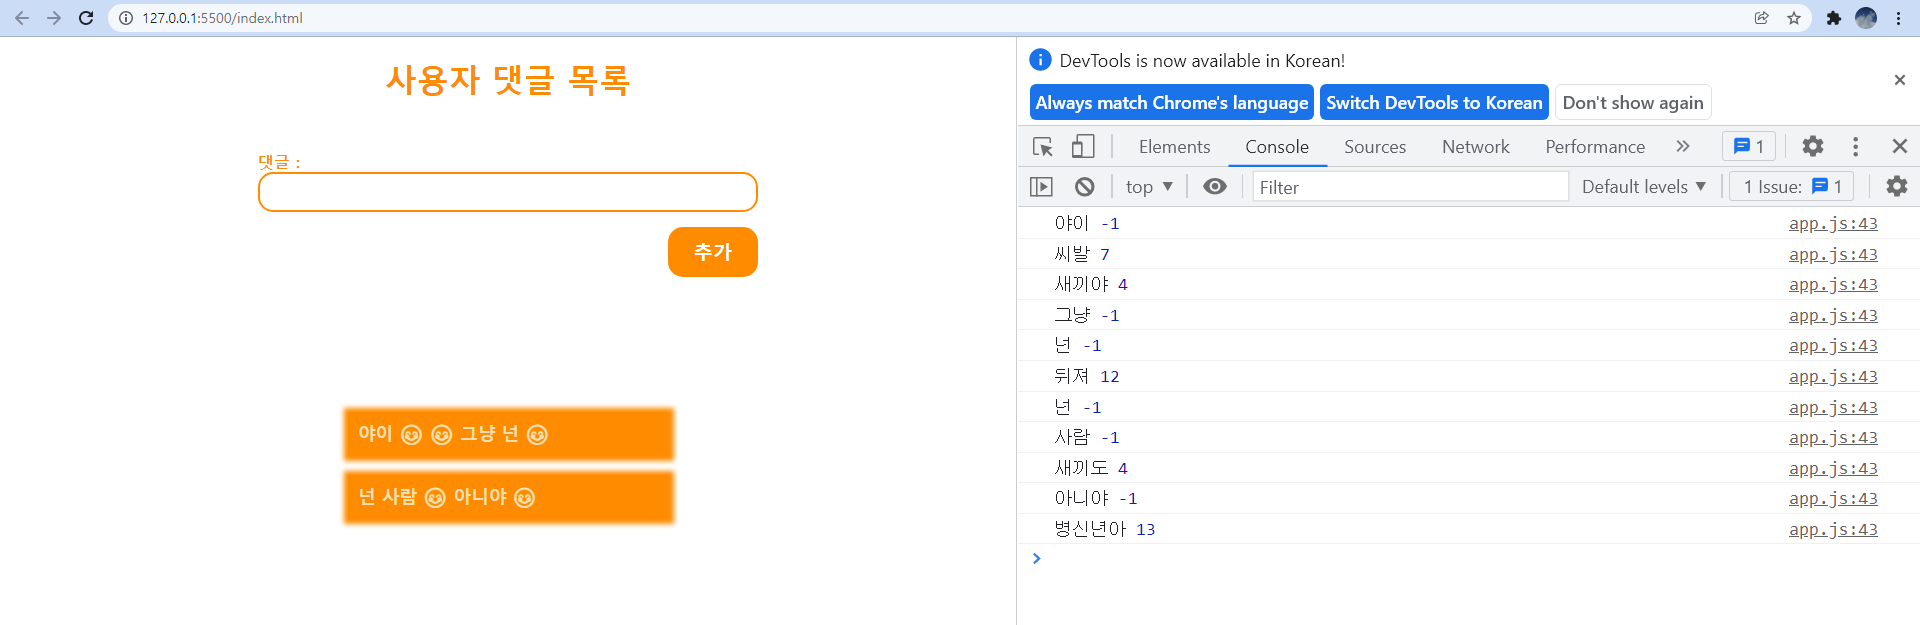
관련된 코드는 아래와 같다.
const commentInput = document.getElementById('user-comment-input') // 사용자 댓글 입력창
const userComments = document.getElementById('user-comments') // 사용자 댓글 리스트 출력

const submitBtn = document.getElementById('user-comment-add') //  사용자 댓글 추가 버튼
const comments = [] // 사용자 댓글목록 배열
const insults = ['shit', 'fuck', 'poop', 'dumb', '새끼', '놈', '똥', '씨발', '좇', '시발', '좆', '죽어', '뒤져', '병신', '년']


// 댓글 정보로부터 댓글에 대한 DOM 객체 생성 및 반환
function buildElement(comment){
   // 구현하기
}
// comments 배열을 이용하여 화면에 댓글목록 보여주기
function displayComments(comments){
    userComments.innerHTML = ''
    // 구현하기
}

// 입력창 초기화
function initInput(){
    commentInput.value = ''
}

// 댓글 추가하기
function addComment(){
    const comment = commentInput.value

    if(comment !== ''){
        // 구현하기
    }else{
        alert('You need to give a comment !')
    }
}

submitBtn.addEventListener('click', addComment)
<!DOCTYPE html>
<html lang="en">
<head>
<meta charset="UTF-8">
<meta http-equiv="X-UA-Compatible" content="IE=edge">
<meta name="viewport" content="width=device-width, initial-scale=1.0">
<title>자바스크립트 연습</title>
<link rel='stylesheet' href='style.css'/>
</head>
<body>
<h1>사용자 댓글 목록</h1>
<div id="form">
<label>댓글 : <input type="text" id='user-comment-input'></label><br/>
<button id='user-comment-add'>추가</button>
</div>
<div id="user-comments"></div>
<script src="app.js"></script>
</body>
</html>h1{
text-align: center;
color: darkorange;
}
#form{
width: 500px;
margin: 50px auto;
}
label{
font-weight: bold;
font-size: 1rem;
color: darkorange;
}
#user-comment-input{
all: unset;
width: 100%;
height: 40px;
border-radius: 15px;
border: 2px solid darkorange;
box-sizing: border-box;
padding-left: 10px;
}
#user-comments{
width: 500px;
margin: 200px auto;
display: flex;
flex-direction: column;
justify-content: center;
align-items: center;
}
.comment{
box-shadow: 1px 1px 5px 5px darkorange;
padding: 10px;
background: darkorange;
color: wheat;
font-weight: bold;
font-size: 1.1rem;
width: 300px;
margin-bottom: 20px;
}
#user-comment-add{
all: unset;
width: 70px;
height: 30px;
background: darkorange;
color: white;
font-size: 1.2rem;
font-weight: bold;
float: right;
border-radius: 15px;
margin-top: 15px;
padding: 10px;
text-align: center;
cursor: pointer;
}
* 연습과제 6
str의 길이를 확인하고, 최대 길이 maxlength를 초과하는 경우 str의 끝을 생략 부호 ("…")로 대체해주는 함수 truncate(str, maxlength)를 만들어보자! 새로 만든 문자열의 길이는 maxlength가 되어야 합니다. (단, 함수의 반환 값은 원하는 길이로 줄여진 문자열이 되어야 한다.)
truncate("What I'd like to tell on this topic is:", 20) = "What I'd like to te…"

truncate("Hi everyone!", 20) = "Hi everyone!"
'프론트엔드 > Javascript' 카테고리의 다른 글
| 자바스크립트 문법 13 - 함수(function)의 활용 (0) | 2022.01.26 |
|---|---|
| 자바스크리트 문법 10 - 2차원 배열과 배열의 확장 (0) | 2022.01.13 |
| 자바스크립트 문법 8 - 배열(Array) 의 다양한 메서드 2 (변경과 정렬) (0) | 2021.12.28 |
| 자바스크립트 문법 7 - 배열(Array) 의 다양한 메서드 1 (검색과 조회) (0) | 2021.12.27 |
| 자바스크립트 문법 5 - 이벤트(Event) 처리하기 3 (0) | 2021.12.23 |